(change lead-in) |
|||
| Line 1: | Line 1: | ||
{{UIHowTo}} |
{{UIHowTo}} |
||
| − | UIDropDownMenu is a [[FrameXML]] Frame template that can be used to create contextual menus and dropdown boxes in World of Warcraft. This tutorial explains how to use it in your addon. |
+ | '''UIDropDownMenu''' is a [[FrameXML]] Frame template that can be used to create contextual menus and dropdown boxes in World of Warcraft. This tutorial explains how to use it in your addon. |
| + | |||
| + | == Provided functionality == |
||
| + | The template can be used to create two UI elements: drop-down lists and context menus, shown below. The differences between the two are mostly cosmetic; both allow a multi-level menu to be displayed to the user. |
||
| + | {| |
||
| + | ! align="center" | Drop-down list |
||
| + | ! align="center" | Context menu |
||
| + | |- |
||
| + | | [[Image:UIDropDownMenu-NoMenu.png]] |
||
| + | | [[Image:UIDropDownMenu-Menu.png|162px]] |
||
| + | |} |
||
| + | Menu items may be disabled, checked, show a color picker swatch, or be styled as a title. The template automatically creates a drop-down box, as well as any list buttons as necessary. |
||
| + | |||
== Step 1 : The Button == |
== Step 1 : The Button == |
||
Revision as of 09:16, 1 December 2009
UIDropDownMenu is a FrameXML Frame template that can be used to create contextual menus and dropdown boxes in World of Warcraft. This tutorial explains how to use it in your addon.
Provided functionality
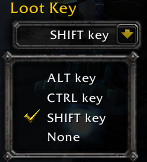
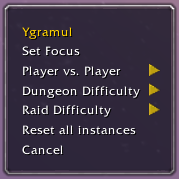
The template can be used to create two UI elements: drop-down lists and context menus, shown below. The differences between the two are mostly cosmetic; both allow a multi-level menu to be displayed to the user.
| Drop-down list | Context menu |
|---|---|
|
|
Menu items may be disabled, checked, show a color picker swatch, or be styled as a title. The template automatically creates a drop-down box, as well as any list buttons as necessary.
Step 1 : The Button
This button will cause the drop down menu to be displayed.
   <Frame parent="UIParent">
       <Frames>
           <Button name="MyDropDownMenuButton">
               <Scripts>
                   <OnClick>
                       MyDropDownMenuButton_OnClick();
                   </OnClick>
               </Scripts>
           </Button>
       </Frames>
   </Frame>
Next, you must choose how you want the menu to be displayed. There are two options, the last requires an extra frame.
- The standard drop down menu.
- Using the "MENU" keyword.
Step 2 : The Menu
If you choose the second, "MENU" option, an extra frame is required. Otherwise, skip this step.
   <Frame name="MyDropDownMenu" inherits="UIDropDownMenuTemplate" id="1">
       <Scripts>
           <OnLoad>
               UIDropDownMenu_Initialize(this, MyDropDownMenu_OnLoad, "MENU");
           </OnLoad>
       </Scripts>
   </Frame>
The frame must inherit the UIDropDownMenuTemplate, unless you choose to remake that frame.
Step 3 : Initialization
If you skipped #Step 2 : The Menu, you must add an OnLoad function to your button in the following fashion. This will display the menu in the first style specified in #Step 1 : The Button.
  <Frame parent="UIParent">
       <Frames>
           <Button name="MyDropDownMenuButton">
               <Scripts>
                   <OnLoad>
                       UIDropDownMenu_Initialize(this, MyDropDownMenu_OnLoad);
                   </OnLoad>

                   <OnClick>
                       MyDropDownMenuButton_OnClick();
                   </OnClick>
               </Scripts>
           </Button>
       </Frames>
   </Frame>
As you have seen from the example, the third variable in UIDropDownMenu_Initialize changes the appearance of the menu. If the third variable is nil, the menu will be displayed in the fashion of the first example shown in #Step 1 : The Button. If the third variable is "MENU", which requires the initialization to occur in a separate frame outside of the button as shown in #Step 2 : The Menu, the menu will be displayed in the fashion of the second example shown in #Step 1 : The Button.
The OnLoad function itself should be as follows. This example adds one option to the menu.
   function MyDropDownMenu_OnLoad()
       info            = {};
       info.text       = "This is an option in the menu.";
       info.value      = "OptionVariable";
       info.func       = FunctionCalledWhenOptionIsClicked
                 -- can also be done as function() FunctionCalledWhenOptionIsClicked() end;

       -- Add the above information to the options menu as a button.
       UIDropDownMenu_AddButton(info);
   end
Note that careless use of throw-away tables can make your addon generate a lot of unnecessary memory garbage. This is especially true I you don't create menu only once, but recreate it dynamically every time it is displayed to place check marks or any other dynamic content where it needed. See HOWTO: Use Tables Without Generating Extra Garbage for some advices on how to minimize or eliminate completely garbage generation in such cases.
Step 4 : Showing the Menu
Your menu will be displayed when the button is clicked. This is called by the following function.
   function MyDropDownMenuButton_OnClick()
       ToggleDropDownMenu(1, nil, MyDropDownMenu, MyDropDownMenuButton, 0, 0);
   end
Click here for more information on ToggleDropDownMenu.
If you want to split menus, this code examples may help you:
 -- creating test data structure
 local Test1_Data = {
   ["level1_test_1"] = {
     [1] = { ["name"] = "sublevel 1"; },
     [2] = {	["name"] = "sublevel 2"; },
   },
   ["level1_test_2"] = {
     [1] = {	["name"] = "sublevel A"; },
     [2] = {	["name"] = "sublevel B"; },
   }
 }
 -- menu create function
 function Test1_DropDown_Initialize(self,level)
   level = level or 1;
   if (level == 1) then
     for key, subarray in pairs(Test1_Data) do
       local info = UIDropDownMenu_CreateInfo();
       info.hasArrow = true; -- creates submenu
       info.notCheckable = true;
       info.text = key;
       info.value = {
         ["Level1_Key"] = key;
       };
       UIDropDownMenu_AddButton(info, level);
     end -- for key, subarray
   end -- if level 1

   if (level == 2) then
     -- getting values of first menu
     local Level1_Key = UIDROPDOWNMENU_MENU_VALUE["Level1_Key"];
     subarray = Test1_Data[Level1_Key];
     for key, subsubarray in pairs(subarray) do
       local info = UIDropDownMenu_CreateInfo();
       info.hasArrow = false; -- no submenues this time
       info.notCheckable = true;
       info.text = subsubarray["name"];
       -- use info.func to set a function to be called at "click"
       info.value = {
         ["Level1_Key"] = Level1_Key;
         ["Sublevel_Key"] = key;
       };
       UIDropDownMenu_AddButton(info, level);
     end -- for key,subsubarray
   end -- if level 2
 end -- function Test1_DropDown_Initialize
To use the Menu, you can do
 local dropdown = CreateFrame("Frame", "Test_DropDown", UIParent, "UIDropDownMenuTemplate");
 UIDropDownMenu_Initialize(dropdown, Test1_DropDown_Initialize, "MENU");
and you need something to active the menu, as with any menu
ToggleDropDownMenu(1, nil, dropdown, self, -20, 0);
See also
- UI Object UIDropDownMenu: template documentation.
- API EasyMenu: a table-based interface for dropdowns