m (→External links: External link fix) |
CowardlyLion (talk | contribs) |
||
| Line 1: | Line 1: | ||
| + | {{infobox instance |
||
| − | <onlyinclude>{{{{{tpl|tooltip}}} |
||
| + | |name=Scarlet Monastery |
||
| − | |mode={{{mode|}}} |
||
| + | |aka=SM - x |
||
| − | |arg={{{arg|}}} |
||
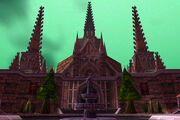
| + | |ss=Scarlet Monastery loading screen.jpg |
||
| − | |name=Gossamer Potion |
||
| + | |caption=Scarlet Monastery loading graphic |
||
| − | |itemid=37661 |
||
| + | |loc=[[Whispering Gardens]], [[Tirisfal Glades]] |
||
| − | |quality=Common |
||
| + | |race={{Race|Human }}<br />{{Race|Undead }} |
||
| − | |ilvl=1 |
||
| + | |boss=[[Sally Whitemane|High Inquisitor Whitemane]] and [[Scarlet Commander Mograine]] |
||
| − | |icon=INV_Potion_30 |
||
| − | | |
+ | |type= |
| + | |level=33-40 |
||
| − | |unique=1 |
||
| + | |minlevel=20 |
||
| − | |cooldown=5 sec |
||
| + | |players=5 |
||
| − | |cast=2 sec |
||
| + | |key={{Loot|uncommon|The Scarlet Key}} (Cathedral and Armory) |
||
| − | |effect=Use: Drink near Ruuna's Crystal Ball to undergo an out-of-body experience. |
||
| + | |bosses={{Scarlet Monastery}} |
||
| − | }}</onlyinclude> |
||
| + | }} |
||
| − | This item is provided for the quest |
||
| + | The '''Scarlet Monastery''' is one of four strongholds in the world belonging to the fanatical [[Scarlet Crusade]], the others being the [[Scarlet Bastion]] within the ruins of [[Stratholme]], the [[town]] of [[Hearthglen]], and the town of [[Tyr's Hand]]. Located in the northeast corner of the blighted [[Tirisfal Glades]], the Scarlet Monastery was once a cathedral to the [[Light]], now taken over by zealots. The Scarlet Monastery is a complex of four wings, each an [[instance]]d dungeon, for both Horde and Alliance characters. The mobs respawn at the same rate in each of them, except for the Cathedral. |
||
| − | * {{questlong|Neutral|75|Out of Body Experience}} |
||
| + | |||
| + | Recommended character levels range from 28 to 40 for a group of five. The Graveyard is intended for players between level 28 and 33, and can be done even without a full group, usually with 3-4 people. The Library is for players between level 32 and 36, and requires five people to complete at this level range. The Armory also requires 5 people, although 4 can probably down Herod, and is intended for players between level 35 and 37. The Cathedral is definitely the toughest of the four wings, with multiple rough pulls, and will require 5 people. The two bosses, [[Scarlet Commander Mograine]] and [[High Inquisitor Whitemane]], are fought at the same time. The Cathedral is tuned for players between level 36 and 41. All four wings allow anyone level 20 or higher to enter. Due to the large number of low-level blue items, SM is a favorite dungeon for low-level players. High-level players also solo SM in order to get all the blue items, {{loot|Common|Silk Cloth}}, etc., to sell; and SM was a good source of money prior to [[The Burning Crusade]]. You can also do experience runs up to level 45, but past that the low amount of experience is not worth the time. |
||
| + | |||
| + | All of the instanced wings of the Scarlet Monastery are stored on the same map. That means, if you could fly, you can enter the Cathedral, fly, and end up in the Graveyard wing. |
||
| + | == History == |
||
| + | {{wow-dungeons}} |
||
| + | |||
| + | :''The Monastery was once a proud bastion of Lordaeron's priesthood - a center for learning and enlightenment. With the rise of the undead [[Scourge]] during the [[Third War]], the peaceful Monastery was converted into a stronghold of the fanatical Scarlet Crusade. The Crusaders are intolerant of all non-human races, regardless of alliance or affiliation. They believe that any and all outsiders are potential carriers of the undead plague - and must be destroyed. Reports indicate that adventurers who enter the monastery are forced to contend with [[Scarlet Commander Mograine]] - who commands a large garrison of fanatically devoted warriors. However, the monastery's true master is [[High Inquisitor Whitemane]] - a fearsome priestess who possesses the ability to resurrect fallen warriors to do battle in her name.'' |
||
| + | |||
| + | ==Geography== |
||
| + | ===Map=== |
||
| + | <gallery> |
||
| + | File:WorldMap-ScarletMonastery1.jpg|Graveyard |
||
| + | File:WorldMap-ScarletMonastery2.jpg|Library |
||
| + | File:WorldMap-ScarletMonastery3.jpg|Armory |
||
| + | File:WorldMap-ScarletMonastery4.jpg|Cathedral |
||
| + | </gallery> |
||
| + | |||
| + | == Quest guide == |
||
| + | {| class="darktable" |
||
| + | |+ Quests |
||
| + | |- |
||
| + | ! Faction |
||
| + | ! Quest name |
||
| + | ! Quest giver |
||
| + | ! Zone location |
||
| + | ! Significant wings |
||
| + | |- |
||
| + | ! rowspan="2" |{{Alliance Icon Small}} Alliance |
||
| + | | {{questlong|Alliance|38|Mythology of the Titans}} |
||
| + | | {{RaceIcon|Dwarf|Female|Small}}{{NPC|Alliance|Librarian Mae Paledust}} |
||
| + | | [[Library (Ironforge)|The Library]], [[Ironforge]] |
||
| + | | Library |
||
| + | |- |
||
| + | | {{questlong|Alliance|40|In the Name of the Light}} |
||
| + | | {{RaceIcon|Human|Male|Small}}{{NPC|Alliance|Raleigh the Devout}} |
||
| + | | [[Southshore]], [[Hillsbrad Foothills]] |
||
| + | | Armory, Cathedral, Library |
||
| + | |- |
||
| + | !rowspan="13"|{{Horde Icon Small}} Horde |
||
| + | | {{questlong|Horde|33|Going, Going, Guano!}} (Pre-requisite) |
||
| + | | {{RaceIcon|Undead|Male|Small}}{{NPC|Horde|Master Apothecary Faranell}} |
||
| + | | [[The Apothecarium]], [[Undercity]] |
||
| + | | All wings |
||
| + | |- |
||
| + | | {{questlong|Horde|33|Hearts of Zeal}} |
||
| + | | {{RaceIcon|Undead|Male|Small}}{{horde}} Master Apothecary Faranell |
||
| + | | The Apothecarium, Undercity |
||
| + | | All wings |
||
| + | |- |
||
| + | | {{questlong|Horde|33|Vorrel's Revenge}} |
||
| + | | {{RaceIcon|Undead|Male|Small}}{{NPC|Horde|Vorrel Sengutz}} |
||
| + | | [[Chamber of Atonement]], Scarlet Monastery |
||
| + | | Graveyard |
||
| + | |- |
||
| + | | {{questlong|Horde|26|Test of Faith}} (Pre-requisite) |
||
| + | | {{RaceIcon|Tauren|Male|Small}}{{NPC|Horde|Dorn Plainstalker}} |
||
| + | | [[Thousand Needles]] |
||
| + | | Library |
||
| + | |- |
||
| + | | {{questlong|Horde|30|Test of Endurance}} (Pre-requisite) |
||
| + | | {{RaceIcon|Tauren|Male|Small}}{{horde}} Dorn Plainstalker |
||
| + | | Thousand Needles |
||
| + | | Library |
||
| + | |- |
||
| + | | {{questlong|Horde|30|Test of Strength}} (Pre-requisite) |
||
| + | | {{RaceIcon|Tauren|Male|Small}}{{horde}} Dorn Plainstalker |
||
| + | | Thousand Needles |
||
| + | | Library |
||
| + | |- |
||
| + | | {{questlong|Horde|30|Test of Lore}} (Pre-requisite) |
||
| + | | {{RaceIcon|Tauren|Male|Small}}{{horde}} Dorn Plainstalker |
||
| + | | Thousand Needles |
||
| + | | Library |
||
| + | |- |
||
| + | | {{questlong|Horde|30|Test of Lore (2)}} (Pre-requisite) |
||
| + | | {{RaceIcon|Tauren|Male|Small}}{{NPC|Horde|Braug Dimspirit}} |
||
| + | | [[Stonetalon Mountains]] |
||
| + | | Library |
||
| + | |- |
||
| + | | {{questlong|Horde|30|Test of Lore (3)}} (Pre-requisite) |
||
| + | | {{RaceIcon|Tauren|Male|Small}}{{horde}} Braug Dimspirit |
||
| + | | Stonetalon Mountains |
||
| + | | Library |
||
| + | |- |
||
| + | | {{questlong|Horde|30|Test of Lore (4)}} (Pre-requisite) |
||
| + | | {{RaceIcon|Tauren|Male|Small}}{{horde}} Braug Dimspirit |
||
| + | | Stonetalon Mountains |
||
| + | | Library |
||
| + | |- |
||
| + | | {{questlong|Horde|36|Test of Lore (5)}} |
||
| + | | {{RaceIcon|Undead|Male|Small}}{{NPC|Horde|Parqual Fintallas}} |
||
| + | | The Apothecarium, Undercity |
||
| + | | Library |
||
| + | |- |
||
| + | | {{questlong|Horde|38|Compendium of the Fallen}} |
||
| + | | {{RaceIcon|Tauren|Male|Small}}{{NPC|Horde|Sage Truthseeker}} |
||
| + | | [[Lower Rise]], [[Thunderbluff]] |
||
| + | | Library |
||
| + | |- |
||
| + | | {{questlong|Horde|42|Into The Scarlet Monastery}} |
||
| + | | {{RaceIcon|Orc|Male|Small}}{{NPC|Horde|Bragor Bloodfist}} |
||
| + | | [[Royal Quarter]], [[Undercity]] |
||
| + | | Armory, Cathedral, Library |
||
| + | |- |
||
| + | ! {{Neutral Icon Small}} Class |
||
| + | | {{questclass|Neutral|Mage|40|Rituals of Power}} |
||
| + | | {{RaceIcon|Human|Male|Small}}{{NPC|Neutral|Magus Tirth}} |
||
| + | | [[Mirage Raceway]], [[Thousand Needles]] |
||
| + | | Library |
||
| + | |} |
||
| + | |||
| + | == Wings == |
||
| + | [[File:Scarlet Monastery Location.jpg|thumb|right|Scarlet Monastery location on the map of Tirisfal Glades.]] |
||
| + | [[File:SMbosses.jpg|thumb|right|Scarlet Monastery bosses]] |
||
| + | |||
| + | === Graveyard (29+)=== |
||
| + | The Graveyard, the left-most entrance, is the easiest and smallest. Like the Library, it does not require {{loot|uncommon|The Scarlet Key}} to enter. The mobs are almost entirely [[undead]]; and, unlike most instances, most are non-elite. |
||
| + | |||
| + | '''In the [[Chamber of Atonement]]''' |
||
| + | *[[Interrogator Vishas]] |
||
| + | |||
| + | '''In the [[Forlorn Cloister]]''' |
||
| + | *[[Azshir the Sleepless]] (Rare spawn) |
||
| + | *[[Fallen Champion]] (Rare spawn) |
||
| + | *[[Ironspine]] (Rare spawn) |
||
| + | *[[Headless Horseman]] ([[Hallow's End]]) |
||
| + | |||
| + | '''In [[Honor's Tomb (Scarlet Monastery)|Honor's Tomb]]''' |
||
| + | *[[Bloodmage Thalnos]] |
||
| + | |||
| + | === Library (31+) === |
||
| + | The Library, the right-most entrance, consists of three sections: the [[Huntsman's Cloister]], with Scarlet Beastmasters and the boss Houndmaster Locksey; the [[Gallery of Treasures]]; and the [[Athenaeum]] with the boss Arcanist Doan and the chest containing {{loot|uncommon|The Scarlet Key}} (required to open the Armory and Cathedral doors). |
||
| + | |||
| + | Dungeon Denizens: |
||
| + | |||
| + | '''The Soldiers''' |
||
| + | *{{mob|Scarlet Gallant}} - Melee, uses Crusader Strike and {{ability|Hammer of Justice}} |
||
| + | *{{mob|Scarlet Beastmaster}} - Casts {{ability|Shoot}} and Exploding Shot (fire damage to the target and and nearby party members). Has a Scarlet Tracking Hound following him. |
||
| + | |||
| + | '''The Priesthood''' |
||
| + | *{{mob|Scarlet Chaplain}} - Casts {{ability|Inner Fire}}, {{ability|Renew}}, and {{ability|Power Word: Shield}}. Kill these quickly. |
||
| + | *{{mob|Scarlet Adept}} - Casts Holy Smite and {{ability|Heal}}. |
||
| + | *{{mob|Scarlet Monk}} - Casts Thrash (allows the caster 2 additional attacks) and [[Kick]]. |
||
| + | |||
| + | '''The Wizards''' |
||
| + | *{{mob|Scarlet Diviner}} - Casts {{ability|Fireball}} and {{ability|Mana Burn}} |
||
| + | |||
| + | '''Bosses''' |
||
| + | *{{mob|Houndmaster Loksey}} |
||
| + | *{{mob|Arcanist Doan}} |
||
| + | |||
| + | === Armory (33+)=== |
||
| + | The Armory, the second entrance from the right, requires either {{loot|uncommon|The Scarlet Key}} from the Library or some other method of [[unlock]]ing to enter. Like the Library, it starts with a cloister. Lots of humanoid guards block the way to {{mob|Herod}} (the main boss and Scarlet Champion). Any mistake may cause the party to pull too many mobs and die. Herod's locked chamber can be opened the same ways as the front door. Once inside, you will fight him, and him alone. The battle is not over, though; as afterward 30 Trainees spawn outside the room, run in, and swarm you. Easy to kill, they will once in a while drop {{loot|uncommon|Tabard of the Scarlet Crusade}}. |
||
| + | |||
| + | The Armory contains different mobs from the Library: |
||
| + | |||
| + | [[Training Grounds]]: |
||
| + | *{{mob|Scarlet Soldier}} - Melee, uses Improved Blocking. |
||
| + | *{{mob|Scarlet Conjuror}} - Casts {{ability|Fireball}} and comes with a [[Fire Elemental]] [[pet]] |
||
| + | |||
| + | [[Footman's Armory]]: |
||
| + | *{{mob|Scarlet Protector}} - Heavy [[Armor]], uses {{ability|Devotion Aura}} and {{ability|Holy Light (Paladin ability)|Holy Light}} |
||
| + | *{{mob|Scarlet Guardsman}} - Melee, uses {{ability|Defensive Stance}}, and occasionally {{ability|Disarm}}. |
||
| + | *{{mob|Scarlet Evoker}} - Casts {{ability|Fireball}}, {{ability|Flamestrike}}, and {{ability|Fire Shield}}. |
||
| + | |||
| + | [[Crusader's Armory]]: |
||
| + | *{{mob|Scarlet Defender}} - Melee, uses {{ability|Defensive Stance}}, Improved Blocking, and {{ability|Shield Bash}}. |
||
| + | *{{mob|Scarlet Myrmidon}} - Melee, hits hard and {{ability|Enrage}}s at low HP. |
||
| + | |||
| + | [[Hall of Champions]]: |
||
| + | *{{mob|Herod}}, the Scarlet Champion |
||
| + | |||
| + | The Hall of Champions also has a collection of large statues of the order's most praised heroes: |
||
| + | * [[Arellas Fireleaf]] |
||
| + | * [[Barean Westwind]] |
||
| + | * [[Dorgar Stoenbrow]] |
||
| + | * [[Fellari Swiftarrow]] |
||
| + | * [[Ferren Marcus]] |
||
| + | * [[Harthal Truesight]] |
||
| + | * [[Holia Sunshield]] |
||
| + | * [[Invar One-Arm]] |
||
| + | * [[Orman of Stromgarde]] |
||
| + | * [[Valea Twinblades]] |
||
| + | * [[Yana Bloodspear]] |
||
| + | |||
| + | === Cathedral (36+)=== |
||
| + | [[File:Scarlet Monastery.jpg|thumb|The Cathedral of the Scarlet Monastery.]] |
||
| + | |||
| + | The Cathedral (the second entrance from the left) is locked like the Armory, requiring the same {{loot|uncommon|The Scarlet Key}} or other [[unlock]]ing method. It also starts with a cloister, the [[Chapel Gardens]]; and is followed by the [[Crusader's Chapel]], which houses the three bosses. As in the rest of SM, fleeing humanoids can easily pull lots of other mob groups. Before engaging the final bosses, {{mob|High Inquisitor Whitemane}} and {{mob|Scarlet Commander Mograine}}, all of the Cathedral's interior must be cleared of any other enemies, or they will come to their aid. Hunters' traps can freeze or slow Morgraine and Whitemane, so you can have more time for ranged attacks. Another approach is to send either 2 tanks or [[combat pet]]s to take the bosses and have everyone else be ranged and healers. Area attacks and other multi-target spells are useful. After Mograine is killed, Whitemane will come through previously locked doors and resurrect him, and they will heal each other to 100% health. For some classes, the Cathedral is soloable, starting at around level 50. It is a particularly valuable training ground for Hunters, since they can learn much about double-mob pulling and trapping here. Warlocks can use the Succubus to control humans and prevent them from running. |
||
| + | |||
| + | Enemies: |
||
| + | * {{mob|Scarlet Centurion}} - Melee, hits quite hard, uses {{ability|Battle Shout}} to raise their attack power. |
||
| + | * {{mob|Scarlet Sorcerer}} - Casts {{ability|Blizzard}}, {{ability|Frostbolt}}, and {{ability|Slow}}. |
||
| + | * {{mob|Scarlet Wizard}} - Their spells and armor are relatively weak. If it is necessary to engage both a Wizard and Centurion/Myrmidon/Champion (melee) at once, tank the melee mob and kill the Wizard first. Try not to gather around these guys since they use {{ability|Fire Shield}} and will spam {{ability|Arcane Explosion}} if several party members are close to them. |
||
| + | * {{mob|Scarlet Champion}} - A fairly minimal threat one on one, if you have good armor. However in numbers these can be dangerous, especially if accompanied by an Abbot who can heal them. Try taking them out quickly, preferably after the healers and casters since their Holy Strike is quite a pain. |
||
| + | * {{mob|Scarlet Abbot}} - Priority target that has {{ability|Inner Fire}}. Focus fire and kill these as soon as you see them, before any other mobs. Interrupt their spells if you can, and use mana-drain spells to prevent them from healing with {{ability|Renew}} and {{ability|Heal}}. They don't run, but {{ability|Enrage}} at low HP instead. |
||
| + | * In addition, Library and Armory mobs populate the Cathedral. |
||
| + | |||
| + | Bosses: |
||
| + | *{{mob|High Inquisitor Fairbanks}} |
||
| + | *{{mob|Scarlet Commander Mograine}} |
||
| + | *{{mob|High Inquisitor Whitemane}} |
||
| + | |||
| + | ==Cataclysm== |
||
| + | The Scarlet Monastery is getting new quests in Cataclysm. The Alliance now helps Scarlet Renegades lead by [[Joseph the Insane]] take over the Monastery, while The Horde gets more quests for every wing of the instance, now lead by [[Dark Ranger Velonara]]. |
||
| + | |||
| + | == Dungeon denizens == |
||
| + | {{main|Scarlet Monastery mobs}} |
||
| + | * {{RaceIconExt|Fire|Small}} [[Fire elemental]]s |
||
| + | * {{RaceIcon|Undead|Male|Small}}{{RaceIcon|Undead|Female|Small}} [[Forsaken]] |
||
| + | * {{RaceIconExt|Ghost|Small}} [[Ghost]] (one, [[Azshir the Sleepless]]) |
||
| + | * {{RaceIcon|Human|Male|Small}}{{RaceIcon|Human|Female|Small}} [[Human]]s |
||
| + | * {{RaceIconExt|Hyena|Small}} [[Hyena]]s |
||
| + | * {{RaceIconExt|Rabbit|Small}} [[Rabbit]]s (critters) |
||
| + | * {{RaceIconExt|Rat|Small}} [[Rat]]s (critters) |
||
| + | * {{RaceIconExt|Shade|Small}} [[Shade]]s |
||
| + | * {{RaceIconExt|SkeletalMage|Small}} [[Skeletal mage]] (one, [[Bloodmage Thalnos]]) |
||
| + | * {{RaceIconExt|SkeletalWarrior|Small}} [[Skeletal warrior]] (one, [[Ironspine]]) |
||
| + | * {{RaceIconExt|Wraith|Small}} [[Wraith]]s |
||
| + | * {{RaceIconExt|Zombie|Small}} [[Zombie]]s |
||
| + | |||
| + | == Loot == |
||
| + | |||
| + | {| class="darktable zebra" |
||
| + | |+ Loot |
||
| + | |- |
||
| + | !Boss |
||
| + | !Instance |
||
| + | !Weapons and Shields |
||
| + | !Cloth |
||
| + | !Leather |
||
| + | !Mail |
||
| + | !Plate |
||
| + | !Back |
||
| + | !Other |
||
| + | |- |
||
| + | |{{mob|Interrogator Vishas}} |
||
| + | |Graveyard |
||
| + | | |
||
| + | {{loot|Rare|Torturing Poker}}<br /> |
||
| + | {{loot|Rare|Bloody Brass Knuckles}} |
||
| + | | |
||
| + | | |
||
| + | | |
||
| + | | |
||
| + | | |
||
| + | | |
||
| + | |- |
||
| + | |{{mob|Bloodmage Thalnos}} |
||
| + | |Graveyard |
||
| + | | |
||
| + | | |
||
| + | {{loot|Rare|Bloodmage Mantle}} |
||
| + | | |
||
| + | | |
||
| + | | |
||
| + | | |
||
| + | | |
||
| + | {{loot|Rare|Orb of the Forgotten Seer}} |
||
| + | |- |
||
| + | |{{mob|Fallen Champion}} ''(Rare)'' |
||
| + | |Graveyard |
||
| + | | |
||
| + | {{loot|Rare|Morbid Dawn}} |
||
| + | | |
||
| + | {{loot|Rare|Embalmed Shroud}} |
||
| + | | |
||
| + | {{loot|Rare|Ebon Vise}} |
||
| + | | |
||
| + | | |
||
| + | | |
||
| + | | |
||
| + | |- |
||
| + | |{{mob|Azshir the Sleepless}} ''(Rare)'' |
||
| + | |Graveyard |
||
| + | | |
||
| + | {{loot|Rare|Necrotic Wand}} |
||
| + | | |
||
| + | {{loot|Rare|Blighted Leggings}} |
||
| + | | |
||
| + | | |
||
| + | | |
||
| + | | |
||
| + | | |
||
| + | {{loot|Rare|Ghostshard Talisman}} |
||
| + | |- |
||
| + | |{{mob|Ironspine}} ''(Rare)'' |
||
| + | |Graveyard |
||
| + | | |
||
| + | {{loot|Rare|Ironspine's Fist}} |
||
| + | | |
||
| + | | |
||
| + | | |
||
| + | {{loot|Rare|Ironspine's Ribcage}} |
||
| + | | |
||
| + | | |
||
| + | | |
||
| + | {{loot|Rare|Ironspine's Eye}} |
||
| + | |- |
||
| + | |{{mob|Scorn}} <br />''(During [[Scourge Invasion]])'' |
||
| + | |Graveyard |
||
| + | | |
||
| + | {{loot|Rare|Scorn's Focal Dagger}} |
||
| + | | |
||
| + | | |
||
| + | | |
||
| + | {{loot|Rare|The Frozen Clutch}} |
||
| + | | |
||
| + | | |
||
| + | | |
||
| + | {{loot|Rare|Scorn's Icy Choker}} |
||
| + | |- |
||
| + | |{{mob|Headless Horseman}} <br />''(During [[Hallow's End]])'' |
||
| + | |Graveyard |
||
| + | | |
||
| + | {{loot|Epic|The Horseman's Baleful Blade}} |
||
| + | | |
||
| + | {{loot|Rare|Hallowed Helm}} |
||
| + | | |
||
| + | | |
||
| + | | |
||
| + | {{loot|Epic|The Horseman's Horrific Helm}} |
||
| + | | |
||
| + | | |
||
| + | {{loot|Epic|The Horseman's Reins}}<br /> |
||
| + | {{loot|Epic|Ring of Ghoulish Glee}}<br /> |
||
| + | {{loot|Epic|The Horseman's Seal}}<br /> |
||
| + | {{loot|Epic|Wicked Witch's Band}}<br /> |
||
| + | {{loot|Rare|Sinister Squashling}}<br /> |
||
| + | {{loot|Rare|Magic Broom}}<br /> |
||
| + | {{loot|Common|Weighted Jack-o'-Lantern}} |
||
| + | |- |
||
| + | |{{mob|Houndmaster Loksey}} |
||
| + | |The Library |
||
| + | | |
||
| + | {{loot|Rare|Loksey's Training Stick}} |
||
| + | | |
||
| + | | |
||
| + | {{loot|Rare|Dog Training Gloves}} |
||
| + | | |
||
| + | | |
||
| + | | |
||
| + | | |
||
| + | {{loot|Rare|Dog Whistle}} |
||
| + | |- |
||
| + | |{{mob|Arcanist Doan}} |
||
| + | |The Library |
||
| + | | |
||
| + | {{loot|Rare|Hypnotic Blade}}<br /> |
||
| + | {{loot|Rare|Illusionary Rod}} |
||
| + | | |
||
| + | {{loot|Rare|Mantle of Doan}}<br /> |
||
| + | {{loot|Rare|Robe of Doan}} |
||
| + | | |
||
| + | | |
||
| + | | |
||
| + | | |
||
| + | | |
||
| + | {{loot|Epic|Deadman's Hand}} |
||
| + | |- |
||
| + | |{{mob|Herod}} |
||
| + | |Armory |
||
| + | | |
||
| + | {{loot|Rare|Ravager (axe)|Ravager}} |
||
| + | | |
||
| + | | |
||
| + | | |
||
| + | {{loot|Rare|Herod's Shoulder}}<br /> |
||
| + | {{loot|Rare|Raging Berserker's Helm}}<br /> |
||
| + | {{loot|Rare|Scarlet Leggings}} |
||
| + | | |
||
| + | | |
||
| + | | |
||
| + | |- |
||
| + | |{{mob|High Inquisitor Fairbanks}} |
||
| + | |The Cathedral |
||
| + | | |
||
| + | | |
||
| + | {{loot|Rare|Inquisitor's Shawl}} |
||
| + | | |
||
| + | {{loot|Rare|Branded Leather Bracers}} |
||
| + | | |
||
| + | {{loot|Rare|Dusty Mail Boots}} |
||
| + | | |
||
| + | | |
||
| + | | |
||
| + | |- |
||
| + | |{{mob|Scarlet Commander Mograine}} |
||
| + | |The Cathedral |
||
| + | | |
||
| + | {{loot|Rare|Aegis of the Scarlet Commander}}<br /> |
||
| + | {{loot|Rare|Mograine's Might}} |
||
| + | | |
||
| + | | |
||
| + | | |
||
| + | {{loot|Rare|Gauntlets of Divinity}}<br /> |
||
| + | {{loot|Rare|Scarlet Leggings}} |
||
| + | | |
||
| + | | |
||
| + | | |
||
| + | |- |
||
| + | |{{mob|High Inquisitor Whitemane}} |
||
| + | |The Cathedral |
||
| + | | |
||
| + | {{loot|Rare|Hand of Righteousness}} |
||
| + | | |
||
| + | {{loot|Rare|Whitemane's Chapeau}} |
||
| + | | |
||
| + | | |
||
| + | | |
||
| + | | |
||
| + | | |
||
| + | {{loot|Rare|Triune Amulet}} |
||
| + | |} |
||
| + | |||
| + | {| class="darktable" |
||
| + | |+ Trash (BoE loot) |
||
| + | |- |
||
| + | !Weapons and Shields |
||
| + | !Cloth |
||
| + | !Leather |
||
| + | !Mail |
||
| + | !Plate |
||
| + | !Back |
||
| + | !Other |
||
| + | |- |
||
| + | | |
||
| + | {{loot|Rare|Cobalt Crusher}}<br /> |
||
| + | {{loot|Rare|Fight Club}}<br /> |
||
| + | {{loot|Rare|The Butcher (sword)|The Butcher}}<br /> |
||
| + | | |
||
| + | {{loot|Rare|Beguiler Robes}}<br /> |
||
| + | {{loot|Uncommon|Aurora Cowl}} |
||
| + | | |
||
| + | {{loot|Rare|Harbinger Boots}}<br /> |
||
| + | {{loot|Rare|Watchman Pauldrons}} |
||
| + | | |
||
| + | {{loot|Rare|Scarlet Boots}}<br /> |
||
| + | {{loot|Rare|Scarlet Chestpiece}}<br /> |
||
| + | {{loot|Uncommon|Scarlet Belt}}<br /> |
||
| + | {{loot|Uncommon|Scarlet Gauntlets}}<br /> |
||
| + | {{loot|Uncommon|Scarlet Wristguards}} |
||
| + | | |
||
| + | | |
||
| + | | |
||
| + | {{loot|Rare|Mark of Kern}} |
||
| + | |} |
||
| + | |||
| + | ==Videos== |
||
| + | <youtube>YmXsVpsxrXw</youtube> |
||
| + | <youtube>KDjxZXUeT1M</youtube> |
||
| + | |||
| + | == Resources == |
||
| + | * [[Fadeleaf]] |
||
| + | * [[Goldthorn]] |
||
| + | * [[Grave Moss]] |
||
| + | * [[Kingsblood]] |
||
| + | * [[Liferoot]] |
||
| + | |||
| + | == Patches and hotfixes == |
||
| + | * {{Patch 3.0.2|note=NPCs no longer bow to a player with {{loot|Epic|Corrupted Ashbringer}}.}} |
||
| + | * {{Patch 2.3.0|note=Loot from all bosses greatly improved.}} |
||
| + | * {{Patch 1.3.0|note= |
||
| + | **Capped at ten players. |
||
| + | **Doors requiring the Scarlet Key can now also be opened with a Large Seaforium Charge in addition to the lockpick ability.}} |
||
==External links== |
==External links== |
||
| − | <!-- Read http://www. |
+ | <!-- Read http://www.wowwiki.com/WoWWiki:External_links before posting your links here. |
Links that do not conform to the rules will be DELETED. |
Links that do not conform to the rules will be DELETED. |
||
Repeat violations may result in a BAN. |
Repeat violations may result in a BAN. |
||
Have a nice day. :) --> |
Have a nice day. :) --> |
||
| − | {{ |
+ | {{elinks-zone|796|armory=1}} |
| + | |||
| + | {{Scarlet Monastery Subzones}} |
||
| + | {{Tirisfal Glades}} |
||
| + | {{Dungeons}} |
||
| + | [[pl:Scarlet Monastery]] |
||
| − | [[Category:World of Warcraft common quest items]] |
||
| + | [[Category:Scarlet Monastery items| Scarlet Monastery items]] |
||
| + | [[Category:Instance loot]] |
||
| + | [[Category:Instances]] |
||
| + | [[Category:Tirisfal Glades]] |
||
| + | [[Category:Scarlet Crusade]] |
||
| + | [[Category:Scarlet Monastery| ]] |
||
| + | [[Category:Temples]] |
||
| + | [[Category:Crypts]] |
||
| + | [[Category:Guides]] |
||
Revision as of 01:28, 31 October 2010
| Scarlet Monastery | |||||||
|---|---|---|---|---|---|---|---|
| SM - x | |||||||
 Scarlet Monastery loading graphic | |||||||
| Location | Whispering Gardens, Tirisfal Glades | ||||||
| Race(s) |
| ||||||
| End boss | High Inquisitor Whitemane and Scarlet Commander Mograine | ||||||
| Advised level | 33-40 | ||||||
| Minimum level | 20 | ||||||
| Player limit | 5 | ||||||
| Key | [The Scarlet Key] (Cathedral and Armory) | ||||||
| |||||||
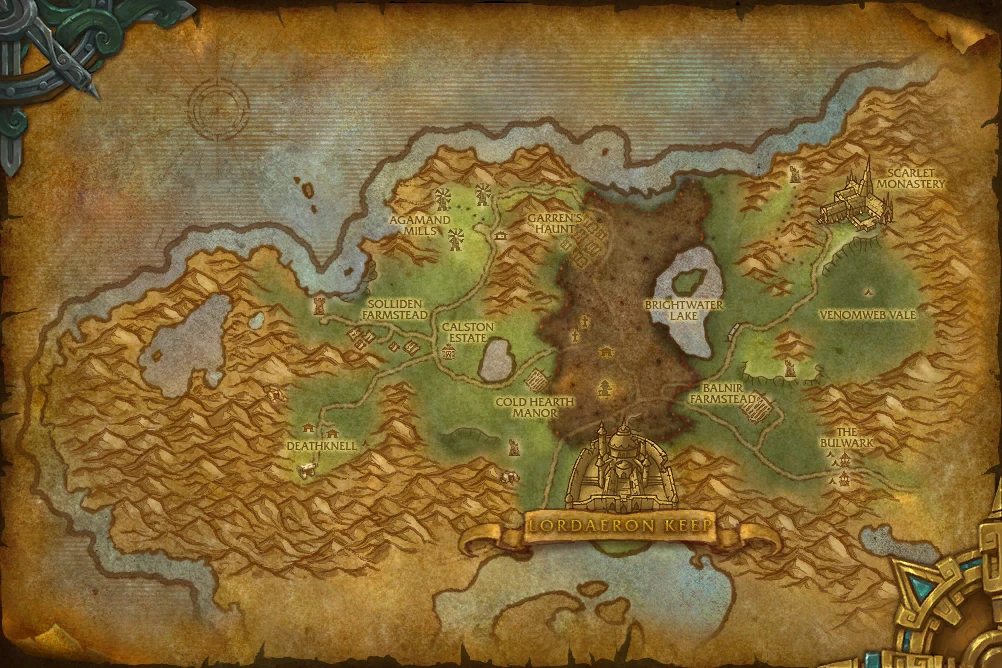
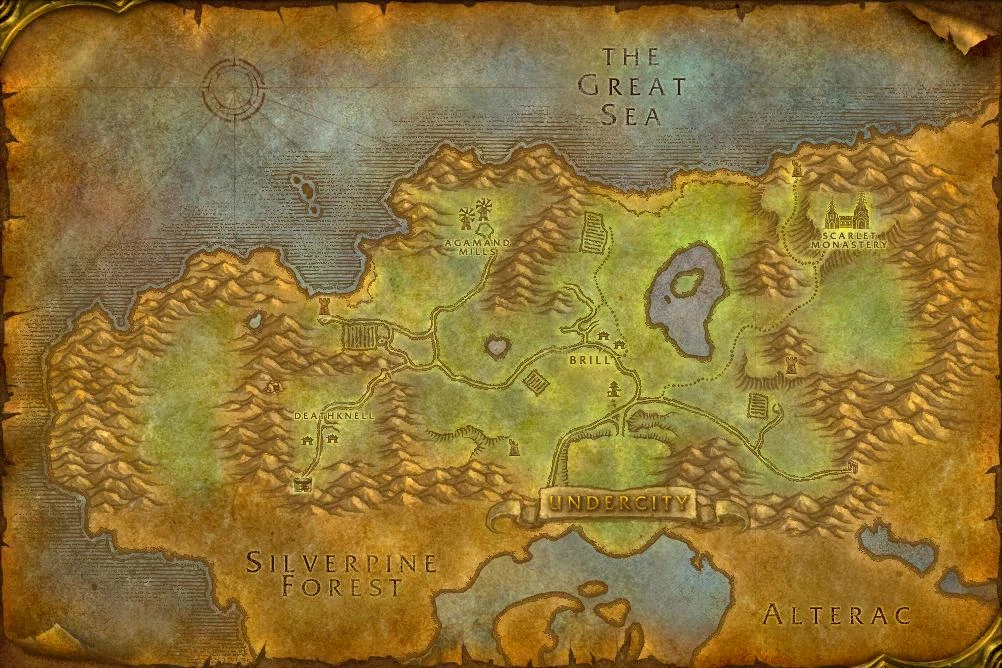
The Scarlet Monastery is one of four strongholds in the world belonging to the fanatical Scarlet Crusade, the others being the Scarlet Bastion within the ruins of Stratholme, the town of Hearthglen, and the town of Tyr's Hand. Located in the northeast corner of the blighted Tirisfal Glades, the Scarlet Monastery was once a cathedral to the Light, now taken over by zealots. The Scarlet Monastery is a complex of four wings, each an instanced dungeon, for both Horde and Alliance characters. The mobs respawn at the same rate in each of them, except for the Cathedral.
Recommended character levels range from 28 to 40 for a group of five. The Graveyard is intended for players between level 28 and 33, and can be done even without a full group, usually with 3-4 people. The Library is for players between level 32 and 36, and requires five people to complete at this level range. The Armory also requires 5 people, although 4 can probably down Herod, and is intended for players between level 35 and 37. The Cathedral is definitely the toughest of the four wings, with multiple rough pulls, and will require 5 people. The two bosses, Scarlet Commander Mograine and High Inquisitor Whitemane, are fought at the same time. The Cathedral is tuned for players between level 36 and 41. All four wings allow anyone level 20 or higher to enter. Due to the large number of low-level blue items, SM is a favorite dungeon for low-level players. High-level players also solo SM in order to get all the blue items, [Silk Cloth], etc., to sell; and SM was a good source of money prior to The Burning Crusade. You can also do experience runs up to level 45, but past that the low amount of experience is not worth the time.
All of the instanced wings of the Scarlet Monastery are stored on the same map. That means, if you could fly, you can enter the Cathedral, fly, and end up in the Graveyard wing.
History
From the World Dungeons page on the official World of Warcraft Community Site:
- The Monastery was once a proud bastion of Lordaeron's priesthood - a center for learning and enlightenment. With the rise of the undead Scourge during the Third War, the peaceful Monastery was converted into a stronghold of the fanatical Scarlet Crusade. The Crusaders are intolerant of all non-human races, regardless of alliance or affiliation. They believe that any and all outsiders are potential carriers of the undead plague - and must be destroyed. Reports indicate that adventurers who enter the monastery are forced to contend with Scarlet Commander Mograine - who commands a large garrison of fanatically devoted warriors. However, the monastery's true master is High Inquisitor Whitemane - a fearsome priestess who possesses the ability to resurrect fallen warriors to do battle in her name.
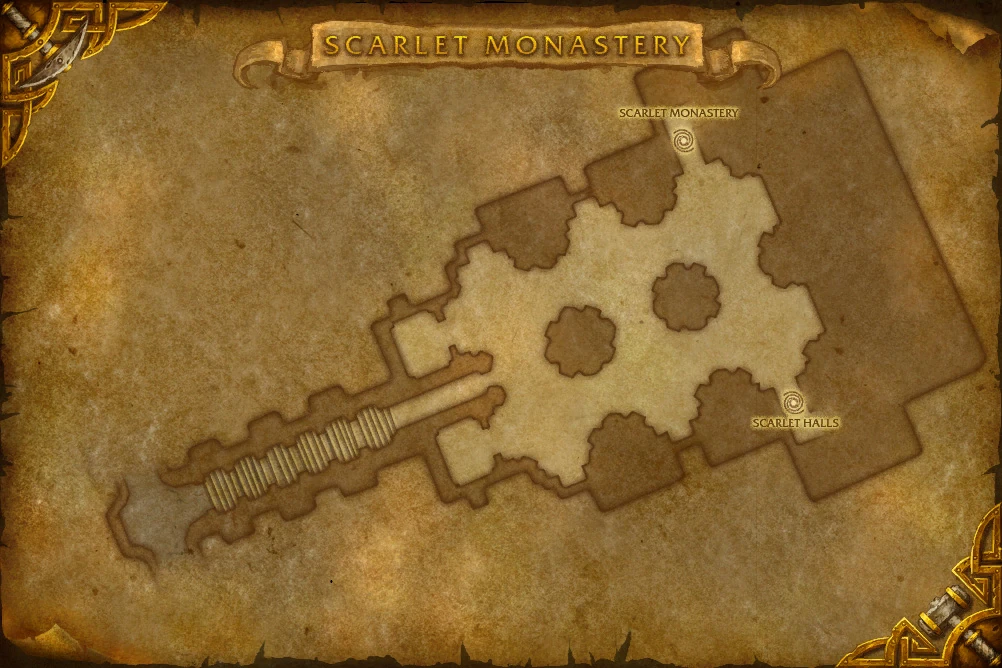
Geography
Map
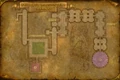
Graveyard
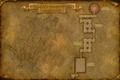
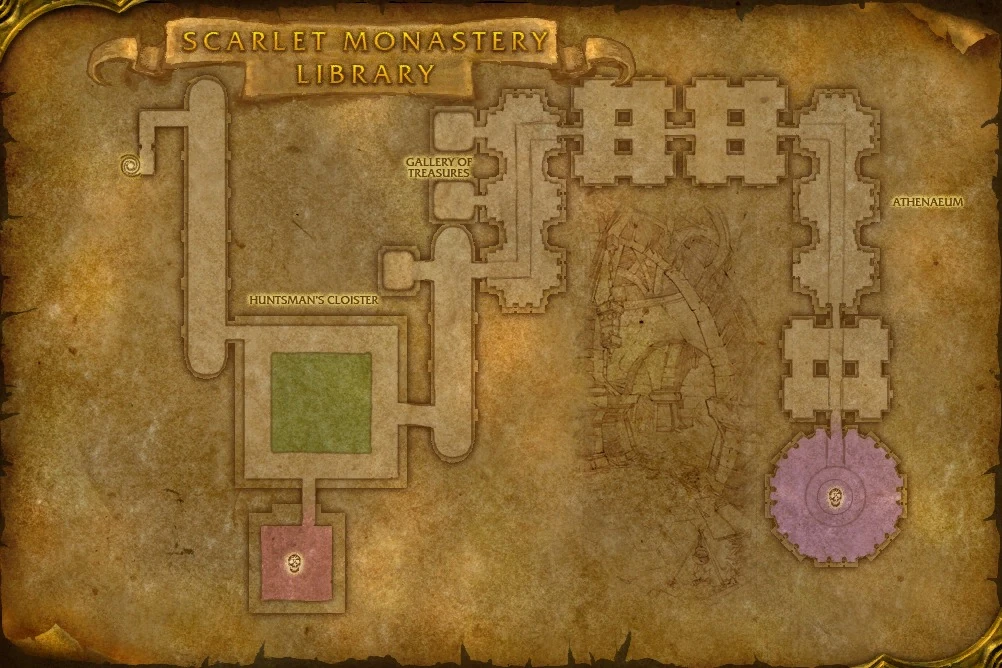
Library
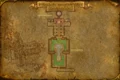
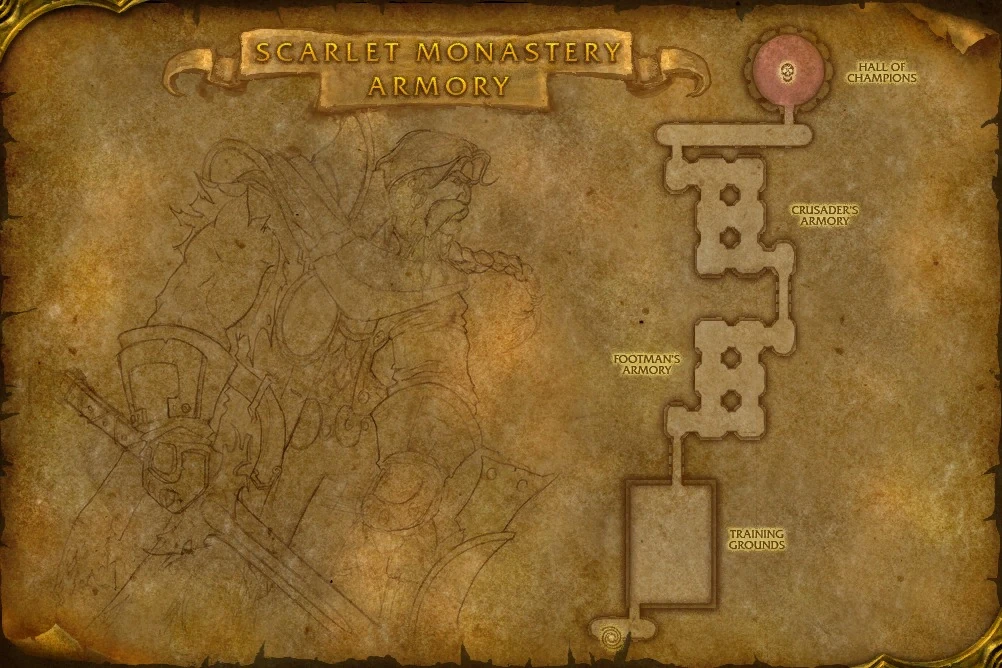
Armory
- WorldMap-ScarletMonastery4.jpg
Cathedral

Quest guide
| Faction | Quest name | Quest giver | Zone location | Significant wings |
|---|---|---|---|---|
| The Library, Ironforge | Library | |||
| Southshore, Hillsbrad Foothills | Armory, Cathedral, Library | |||
| The Apothecarium, Undercity | All wings | |||
| The Apothecarium, Undercity | All wings | |||
| Chamber of Atonement, Scarlet Monastery | Graveyard | |||
| Thousand Needles | Library | |||
| Thousand Needles | Library | |||
| Thousand Needles | Library | |||
| Thousand Needles | Library | |||
| Stonetalon Mountains | Library | |||
| Stonetalon Mountains | Library | |||
| Stonetalon Mountains | Library | |||
| The Apothecarium, Undercity | Library | |||
| Lower Rise, Thunderbluff | Library | |||
| Royal Quarter, Undercity | Armory, Cathedral, Library | |||
| Template:Questclass | Mirage Raceway, Thousand Needles | Library |
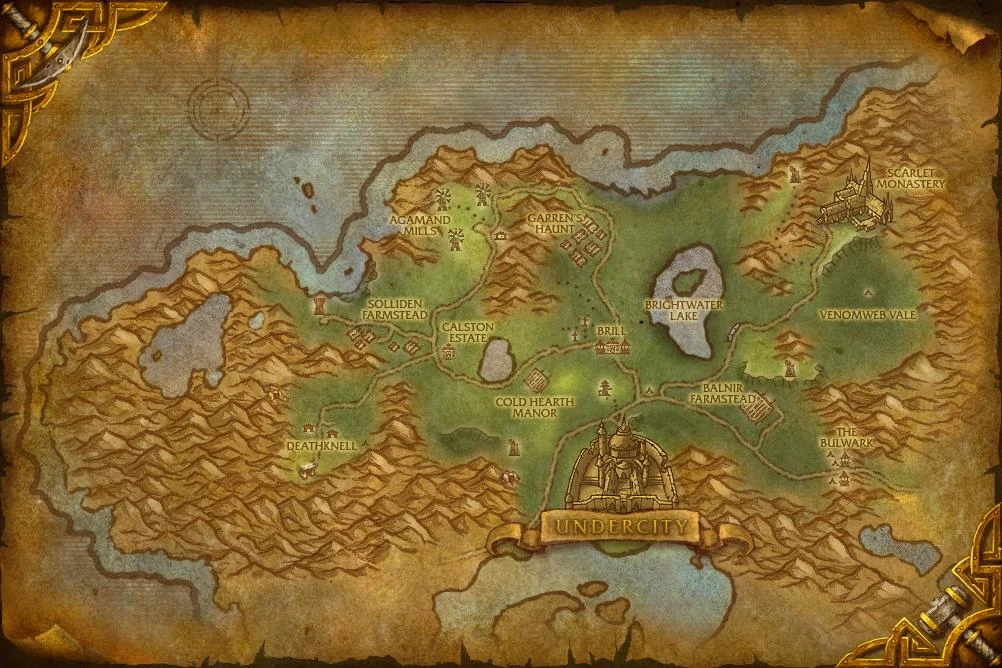
Wings

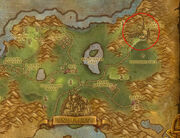
Scarlet Monastery location on the map of Tirisfal Glades.
Scarlet Monastery bosses
Graveyard (29+)
The Graveyard, the left-most entrance, is the easiest and smallest. Like the Library, it does not require [The Scarlet Key] to enter. The mobs are almost entirely undead; and, unlike most instances, most are non-elite.
In the Chamber of Atonement
In the Forlorn Cloister
- Azshir the Sleepless (Rare spawn)
- Fallen Champion (Rare spawn)
- Ironspine (Rare spawn)
- Headless Horseman (Hallow's End)
In Honor's Tomb
Library (31+)
The Library, the right-most entrance, consists of three sections: the Huntsman's Cloister, with Scarlet Beastmasters and the boss Houndmaster Locksey; the Gallery of Treasures; and the Athenaeum with the boss Arcanist Doan and the chest containing [The Scarlet Key] (required to open the Armory and Cathedral doors).
Dungeon Denizens:
The Soldiers
 Scarlet Gallant - Melee, uses Crusader Strike and [Hammer of Justice]
- Scarlet Beastmaster - Casts Shoot and Exploding Shot (fire damage to the target and and nearby party members). Has a Scarlet Tracking Hound following him.
The Priesthood
- Scarlet Chaplain - Casts [Inner Fire], [Renew], and [Power Word: Shield]. Kill these quickly.
- Scarlet Adept - Casts Holy Smite and [Heal].
- Scarlet Monk - Casts Thrash (allows the caster 2 additional attacks) and
 [Kick].
The Wizards
- Scarlet Diviner - Casts [Fireball] and [Mana Burn]
Bosses
Armory (33+)
The Armory, the second entrance from the right, requires either [The Scarlet Key] from the Library or some other method of unlocking to enter. Like the Library, it starts with a cloister. Lots of humanoid guards block the way to ![]() Herod (the main boss and Scarlet Champion). Any mistake may cause the party to pull too many mobs and die. Herod's locked chamber can be opened the same ways as the front door. Once inside, you will fight him, and him alone. The battle is not over, though; as afterward 30 Trainees spawn outside the room, run in, and swarm you. Easy to kill, they will once in a while drop [Tabard of the Scarlet Crusade].
Herod (the main boss and Scarlet Champion). Any mistake may cause the party to pull too many mobs and die. Herod's locked chamber can be opened the same ways as the front door. Once inside, you will fight him, and him alone. The battle is not over, though; as afterward 30 Trainees spawn outside the room, run in, and swarm you. Easy to kill, they will once in a while drop [Tabard of the Scarlet Crusade].
The Armory contains different mobs from the Library:
- Scarlet Soldier - Melee, uses Improved Blocking.
- Scarlet Conjuror - Casts [Fireball] and comes with a Fire Elemental pet
- Scarlet Protector - Heavy Armor, uses [Devotion Aura] and Holy Light
- Scarlet Guardsman - Melee, uses [Defensive Stance], and occasionally [Disarm].
- Scarlet Evoker - Casts [Fireball], [Flamestrike], and Fire Shield.
- Scarlet Defender - Melee, uses [Defensive Stance], Improved Blocking, and [Shield Bash].
- Scarlet Myrmidon - Melee, hits hard and Enrages at low HP.
- Herod, the Scarlet Champion
The Hall of Champions also has a collection of large statues of the order's most praised heroes:
- Arellas Fireleaf
- Barean Westwind
- Dorgar Stoenbrow
- Fellari Swiftarrow
- Ferren Marcus
- Harthal Truesight
- Holia Sunshield
- Invar One-Arm
- Orman of Stromgarde
- Valea Twinblades
- Yana Bloodspear
Cathedral (36+)
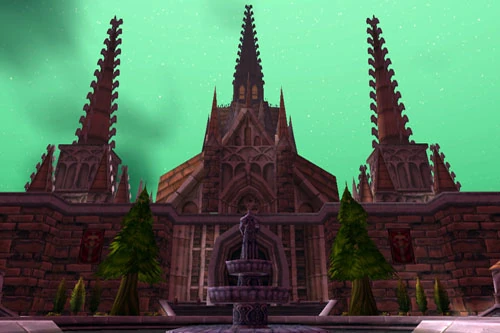
The Cathedral of the Scarlet Monastery.
The Cathedral (the second entrance from the left) is locked like the Armory, requiring the same [The Scarlet Key] or other unlocking method. It also starts with a cloister, the Chapel Gardens; and is followed by the Crusader's Chapel, which houses the three bosses. As in the rest of SM, fleeing humanoids can easily pull lots of other mob groups. Before engaging the final bosses, ![]() High Inquisitor Whitemane and
High Inquisitor Whitemane and ![]() Scarlet Commander Mograine, all of the Cathedral's interior must be cleared of any other enemies, or they will come to their aid. Hunters' traps can freeze or slow Morgraine and Whitemane, so you can have more time for ranged attacks. Another approach is to send either 2 tanks or combat pets to take the bosses and have everyone else be ranged and healers. Area attacks and other multi-target spells are useful. After Mograine is killed, Whitemane will come through previously locked doors and resurrect him, and they will heal each other to 100% health. For some classes, the Cathedral is soloable, starting at around level 50. It is a particularly valuable training ground for Hunters, since they can learn much about double-mob pulling and trapping here. Warlocks can use the Succubus to control humans and prevent them from running.
Scarlet Commander Mograine, all of the Cathedral's interior must be cleared of any other enemies, or they will come to their aid. Hunters' traps can freeze or slow Morgraine and Whitemane, so you can have more time for ranged attacks. Another approach is to send either 2 tanks or combat pets to take the bosses and have everyone else be ranged and healers. Area attacks and other multi-target spells are useful. After Mograine is killed, Whitemane will come through previously locked doors and resurrect him, and they will heal each other to 100% health. For some classes, the Cathedral is soloable, starting at around level 50. It is a particularly valuable training ground for Hunters, since they can learn much about double-mob pulling and trapping here. Warlocks can use the Succubus to control humans and prevent them from running.
Enemies:
- Scarlet Centurion - Melee, hits quite hard, uses [Battle Shout] to raise their attack power.
- Scarlet Sorcerer - Casts [Blizzard], [Frostbolt], and [Slow].
- Scarlet Wizard - Their spells and armor are relatively weak. If it is necessary to engage both a Wizard and Centurion/Myrmidon/Champion (melee) at once, tank the melee mob and kill the Wizard first. Try not to gather around these guys since they use Fire Shield and will spam [Arcane Explosion] if several party members are close to them.
- Scarlet Champion - A fairly minimal threat one on one, if you have good armor. However in numbers these can be dangerous, especially if accompanied by an Abbot who can heal them. Try taking them out quickly, preferably after the healers and casters since their Holy Strike is quite a pain.
- Scarlet Abbot - Priority target that has [Inner Fire]. Focus fire and kill these as soon as you see them, before any other mobs. Interrupt their spells if you can, and use mana-drain spells to prevent them from healing with [Renew] and [Heal]. They don't run, but Enrage at low HP instead.
- In addition, Library and Armory mobs populate the Cathedral.
Bosses:
Cataclysm
The Scarlet Monastery is getting new quests in Cataclysm. The Alliance now helps Scarlet Renegades lead by Joseph the Insane take over the Monastery, while The Horde gets more quests for every wing of the instance, now lead by Dark Ranger Velonara.
Dungeon denizens
- Main article: Scarlet Monastery mobs
- File:IconSmall Fire Small.gif Fire elementals
- Forsaken
- File:IconSmall Ghost Small.gif Ghost (one, Azshir the Sleepless)
- Humans
- File:IconSmall Hyena Small.gif Hyenas
- File:IconSmall Rabbit Small.gif Rabbits (critters)
- File:IconSmall Rat Small.gif Rats (critters)
- File:IconSmall Shade Small.gif Shades
- File:IconSmall SkeletalMage Small.gif Skeletal mage (one, Bloodmage Thalnos)
- File:IconSmall SkeletalWarrior Small.gif Skeletal warrior (one, Ironspine)
- File:IconSmall Wraith Small.gif Wraiths
- File:IconSmall Zombie Small.gif Zombies
Loot
| Boss | Instance | Weapons and Shields | Cloth | Leather | Plate | Back | Other | |
|---|---|---|---|---|---|---|---|---|
| Graveyard | ||||||||
| Graveyard | ||||||||
| Graveyard | ||||||||
| Graveyard | ||||||||
| Graveyard | ||||||||
(During Scourge Invasion) |
Graveyard | |||||||
(During Hallow's End) |
Graveyard |
[The Horseman's Reins] | ||||||
| The Library | ||||||||
| The Library | ||||||||
| Armory |
[Herod's Shoulder] |
|||||||
| The Cathedral | ||||||||
| The Cathedral | ||||||||
| The Cathedral |
| Weapons and Shields | Cloth | Leather | Plate | Back | Other | |
|---|---|---|---|---|---|---|
|
[Scarlet Boots] |
Videos
Resources
Patches and hotfixes
- Patch 3.0.2 (2008-10-14): NPCs no longer bow to a player with [Corrupted Ashbringer].
- Patch 2.3.0 (2007-11-13): Loot from all bosses greatly improved.
- Patch 1.3.0 (2005-03-07):
- Capped at ten players.
- Doors requiring the Scarlet Key can now also be opened with a Large Seaforium Charge in addition to the lockpick ability.
External links
| |||||||||||||||||
| ||||||||