m (→External links: clean up, replaced: wowwiki.com/WoWWiki: → wowpedia.org/Wowpedia:) |
Piumosso uldum (talk | contribs) (→Abilities: Added some heroic info.) |
||
| Line 1: | Line 1: | ||
| + | {{Stub/Cataclysm}} |
||
| − | <onlyinclude>{{{{{tpl|tooltip}}} |
||
| + | {{npcbox |
||
| − | |mode={{{mode|}}} |
||
| + | |name=Conclave of Wind |
||
| − | |arg={{{arg|}}} |
||
| + | |image=Conclave.jpg |
||
| − | |name=Ring of Invincibility |
||
| ⚫ | |||
| − | |itemid=40717 |
||
| + | |type=Boss |
||
| − | |quality=Epic |
||
| + | |faction=Combat |
||
| − | |ilvl=213 |
||
| + | |health= |
||
| − | |icon=INV_Jewelry_Ring_47 |
||
| + | |status = Killable |
||
| − | |slot=Finger |
||
| + | |races=[[Djinni]] |
||
| ⚫ | |||
| + | |creature=Elemental |
||
| − | |bind=BoP |
||
| + | |location=[[Throne of the Four Winds]] |
||
| − | |unique-eq=1 |
||
| + | |instance=Throne of the Four Winds |
||
| − | |effect=Equip: Improves critical strike rating by 43.<br />Equip: Improves haste rating by 38.<br />Equip: Increases attack power by 112. |
||
| + | }} |
||
| − | |attrib=+28 Agility<br />+55 Stamina |
||
| − | }}</onlyinclude> |
||
| − | The Ring of Invincibility is a ring suited for melee dps. The cost of purchase is 25 [[Emblem of Valor]]. |
||
| + | The '''Conclave of Wind''' is a boss encounter in [[Throne of the Four Winds]]. The encounter consists of [[Anshal]], [[Rohash]], and [[Nezir]], the djinni lords of wind and must be eliminated in order to battle the elemental lord himself. |
||
| − | '''''Note:''' This ring will not make the wearer invincible.'' |
||
| + | |||
| − | ==Source== |
||
| + | Although they are spread out, engaging one djinn in combat engages them all. While they will not leave their platforms, each of the individual lords will put a significant debuff (such as reducing [[Haste]] by 500% with increasing frost damage over time) on all players if at any point there is no attackable target on their platform. |
||
| − | *[[Arcanist Adurin]] |
||
| + | |||
| − | *[[Magister Brasael]] |
||
| + | The world first heroic kill was by Paragon (25 person) on 17 December 2010. |
||
| − | *[[Harold Winston]] |
||
| + | |||
| + | ==Abilities== |
||
| + | ''Anshal'' |
||
| + | *{{abilities|Soothing Winds|Summons an area of calm winds (Green circle) on a random friendly target. This area heals all allies for 20000 per second. Any enemies within the area are silenced an pacified while they remain inside the area. This effect lasts for 30 sec.|id=86206|image=spell nature regeneration 02|}} |
||
| + | *{{abilities|Nurture|Summons a Ravenous Creeper nearby every second for 5 sec. Ravenous Creepers have Toxic Spores.|id=85422|image=inv misc trailofflowers|}} |
||
| + | *{{abilities|Toxic Spores|Spores errupt from the caster every second for 5 seconds, afflicting all enemies within 8 yards with a deadly toxin. This toxin deals 500 Nature damage per second for 5 sec and can stack up 25 times.|id=93121|image=spell shadow demonicempathy|}} |
||
| + | *{{abilities|Zephyr|(Full energy) Heals all allies within 100 yards for 25000 health per second. In addition, these targets will also gain 15% increased damage for 15 sec. This effect stacks.|id=93119|image=spell nature natureguardian|}} |
||
| + | |||
| + | ''Nezir'' |
||
| + | *{{abilities|Wind Chill|Deals 4750 to 5250 Frost damage to all enemies within 100 yards and increases all Frost damage taken by 10% for 35 sec. Stacks.|id=93123|image=spell frost frostshock|}} |
||
| + | *{{abilities|Permafrost|Channels a blast of Frost at Nezir's current target, dealing 9500 to 10500 Frost damage per second in a cone towards that target for 3 sec. (14250 to 15750 Frost damage on Heroic difficulty)|id=93123|image=spell ice rune|}} |
||
| + | *{{abilities|Ice Patch|Deals 7125 to 7875 Frost damage per second to all enemies within 20 yards, slowing their movement speed by 10% . This effect stacks. Lasts 3 sec. (19000 to 21000 Frost damage per second on Heroic difficulty.)|id=93130|image=spell frost freezingbreath|}} |
||
| + | *{{abilities|Sleet Storm|(Full energy) Deals 28500 to 31500 Frost damage per second to all targets within 100 yards. This damage is divided among all targets. Lasts 15 sec.|id=86367|image=spell frost arcticwinds|}} |
||
| + | |||
| + | ''Rohash'' |
||
| + | *{{abilities|Slicing Gale|Cast instead of melee-ing. Fierce winds slice through a random enemy target, dealing 11875 to 13125 Nature damage (10-man difficulty), increasing Nature damage they receive by 5% for 30 sec. This effect stacks. (23750 to 26250 Nature damage on Normal 25-man difficulty, 28500 to 31500 Nature damage on Heroic 25-man difficulty)|id=93057|image=ability whirlwind|}} |
||
| + | *{{abilities|Wind Blast|Spins slowly around the platform, blasting the area in front of the caster every second. Any enemies caught within this area are dealt 9500 to 10500 Nature damage and knocked back 200 yards. Lasts 10 sec.|id=93139|image=spell nature cyclone|}} |
||
| + | *{{abilities|Tornado|Summons 3 tornados nearby. These tornados move around the area randomly, dealing 38000 to 42000 Nature damage to any enemies that get within 10 yards of them, knocking them back.|id=93142|image=spell nature earthbind|}} |
||
| + | *{{abilities|Hurricane|(Full energy) Creates a huge vortex of wind, catching all nearby enemies and launching them into the air. Anyone caught by the vortex will take 2500 Nature damage per second for 15 sec. At the end of this effect, affected targets will be dropped out of the air, resulting in additional falling damage.|id=86481|image=spell nature earthbind|}} |
||
| + | |||
| + | ===Enrage=== |
||
| + | Bosses enrage after 8 minutes in 25-man normal mode. |
||
| + | |||
| + | ==Overview== |
||
| + | Each of the Djinn has an [[energy]] bar that slowly approaches 90. When it reaches 90 they will cast their most powerful abilities. All three gain energy at the same rate, and all three will reach 90 at the same time. Players cannot jump between platforms while they are at full strength. |
||
| + | |||
| + | If any Djinn is left alone on his platform, with no player in range, it will cast a raid-wiping ability. Anshal will cast Withering Winds, which reduces all healing by 100%. Nezir will cast Chilling Winds, which will reduce haste by 500%. Rohash will cast Deafening Winds, which will silence everyone in the zone. All three of these abilities include a zone-wide AoE damage tick that increases over time. |
||
| + | |||
| + | You can move between their platforms by jumping into a wind bridge that connects the platforms. However, the bridges disappear when the Djinn are at 90 energy and using their special abilities. |
||
| + | |||
| + | Both Anshal and Nezir do normal melee damage, while Rohash does not require a tank. |
||
| + | |||
| + | When one Djinn dies, it begins to cast Gather Strength, which will resurrect it to full health after one minute. Thus, all three Djinn need to be killed within one minute of each other. |
||
| + | |||
| + | ==Strategy== |
||
| + | |||
| + | There are two alternating phases - the recharge phase, when boss energy is below 90, and the full energy phase, when the bosses are using their ultimate abilities - Zephyr, Sleet Storm and Hurricane. During the recharge phase, the raid is divided between Rohash and Anshal, with DPS bringing them down evenly. During the full energy phase, most of the raid is on Nezir, with DPS bringing him down as much as possible. The general goal is to kill Rohash and Anshal at as close to the same time as possible, while having done enough damage to Nezir during full energy phases to burn him down within the one minute resurrection timer. |
||
| + | |||
| + | ===Recharge Phase=== |
||
| + | During the recharge phase, DPS is split between Rohash and Anshal, while Nezir is handled by just a tank and his healers. |
||
| + | |||
| + | The Rohash group requires fewer DPS and healers, and generally favors ranged DPS due to the Tornadoes that are summoned. No tank is needed since it has no hard-hitting melee attack. Instead, he casts randomly at anyone on the platform. This group needs to watch for Tornadoes and Wind Blast, which can knock you off the platform. The Wind Blast mechanic is similar to the Spout spell from [[The Lurker Below]] encounter in [[Serpentshrine Cavern]]. He will start at a random direction and move clockwise for 10 seconds, blasting anyone in his line of sight. Everyone on the platform needs to move clockwise to avoid the blast or be knocked off and most likely killed. |
||
| + | |||
| + | The Anshal group requires a tank and slightly more healing compared to the Rohash group. This group also needs extra DPS, due to adds and Anshal's healing ability. When Rohash summons Ravenous Creepers, the DPS need to split these up and burn them down quickly before the Toxic Spores stack too high on everyone. An extra tank or high armor DPS can help to separate them. Avoid the Soothing Winds healing circle on the ground, as it heals the boss and Creepers, and pacifies any player in it. |
||
| + | |||
| + | The Nezir group requires only a tank and healing. During the recharing phase, no DPS is with Nezir. The tank needs to face the boss away from anyone else to avoid excess damage from Permafrost. The healers will need to move out of any Ice Patches that appear, and take care not to stand on the pathways coming in to the platform. During the full energy phase, players from the other platforms will move to Nezir's platform, and they don't want to land in a patch of ice. Wind Chill will stack on the Nezir group and damage will increase throughout the phase. |
||
| + | |||
| + | The tank and tank healers for Anshal and Nezir will swap positions every other recharging phase to deal with the stacking Wind Chill debuff. |
||
| + | |||
| + | ===Full Energy Phase=== |
||
| + | At around 80 energy, most of the raid will swap to the Nezir platform to handle his Sleet Storm. The bridges to move between platforms disappear at 90 energy, so players should allow enough time to make it over to their new platforms. |
||
| + | |||
| + | The entire Rohash group, except for a single healer, will move to the Nezir platform. The single healer left behind at Anshal needs to handle the Hurricane, which works much like the Vortex ability in the [[Malygos]] encouter. This healer should be able to heal himself through the Hurricane with instant abilities, and survive the moderate fall damage at the end. |
||
| + | |||
| + | The entire Anshal group, including the tank and his healers, will move to the Nezir platform. The DPS should be sure they've finished off any remaining Creepers before transferring, or they will be healed during Zephyr. |
||
| + | |||
| + | The tank and tank healers at Nezir will move to Anshal's platform to tank him through Zephyr. |
||
| + | |||
| + | During the Sleet Storm, burn down Nezir as much as possible. The raid will be taking constant damage from Sleet Storm during this phase. As long as enough people are still alive and the damage is split sufficiently, the raid healing should be manageable. |
||
| + | |||
| + | Once Sleet Storm is finished channeling, DPS move back to their previous platforms, Anshal or Rohash, and continue to bring them down evenly. The tank and tank healers for Nezir and Anshal remain at their swapped positions. This is to allow enough time for the stacking Wind Chill debuff to fade from the tank group that just handled Nezir. |
||
| + | |||
| + | ===Nezir Burn Phase=== |
||
| + | Anshal and Rohash should die at as close to the same time as possible. Once one dies, the one minute resurrection timer begins, and you need to be able to finish off Nezir before they resurrect. If one is almost dead while the other is behind, call to stop DPS and let them catch up. If one is consistently far behind by the time they are almost dead, then re-balance your DPS groups for the next attempt. It's also possible to re-balance DPS mid-fight after full energy phases when everyone is at Nezir's platform. |
||
| + | |||
| + | Once Anshal and Rohash are dead, everyone moves to Nezir's platform to finish him off. By this time, he should be well below 50% health from previous Sleet Storm phases. Save Heroism/Bloodlust abilities and big DPS cooldowns for this final burn phase. You need to kill him before Anshal or Rohash resurrect, and also before the Wind Chill debuff sacks too high for your raid healers to manage. |
||
| + | |||
| + | If the burn phase is not working out, consider intentionally delaying the death of Anshal and Rohash to add an extra full energy phase to bring down Nezir a bit lower. Note that this approach will bump you closer to the enrage timer. Alternatively, consider staying on Nezir for a few more seconds after a Sleet Storm, before moving back to Anshal and Rohash, to bring him down a bit more. However, staying on Nezir means increased raid damage from Wind Chill, possibly falling behind on adds summoned by Anshal, and increased damage to the lone healer still at Rohash. |
||
| + | |||
| + | The key to this fight will be finding the right balance of DPS for each group assignment, and making the final burn phase doable. |
||
| + | |||
| + | ==Quotes== |
||
| + | ===Anshal=== |
||
| + | ;Aggro |
||
| + | *{{text|yell|It shall be I that earns the favor of our lord by casting out the intruders. My calmest wind shall prove too much for them!}} |
||
| + | |||
| + | ;Killing a player |
||
| + | *{{text|yell|Begone, outsiders!}} |
||
| + | *{{text|yell|Your presence shall no longer defile our home!}} |
||
| + | |||
| + | ;Full power reached |
||
| + | *{{text|yell|The power of our winds, UNLEASHED!}} |
||
| + | |||
| + | ;Low health |
||
| + | *{{text|yell|My power grows feeble, brothers. I shamefully must rely on you for a time.}} |
||
| + | |||
| + | ===Rohash=== |
||
| + | ;Aggro |
||
| + | *{{text|yell|As I am the strongest wind, it shall be I that tears the invaders apart!}} |
||
| + | |||
| + | ;Full power reached |
||
| + | *{{text|yell|The power of our winds, UNLEASHED!}} |
||
| + | |||
| + | ;Low health |
||
| + | *{{text|yell|The intruders stand fast, brothers. I cannot break them. Allow me a brief respite to strengthen my winds.}} |
||
| + | |||
| + | ===Nezir=== |
||
| + | ;Aggro |
||
| + | *{{text|yell|The honor of slaying the interlopers shall be mine, brothers! Their feeble bodies will freeze solid from my wind's icy chill!}} |
||
| + | |||
| + | ;Full power reached |
||
| + | *{{text|yell|The power of our winds, UNLEASHED!}} |
||
| + | |||
| + | ;Low health |
||
| + | *{{text|yell|The intruders stand fast, brothers. I cannot break them. Allow me a brief respite to strengthen my winds.}} |
||
| + | |||
| + | ===Defeat=== |
||
| + | *{{text|yell|Al'Akir|The Conclave of Wind has dissipated. Your honorable conduct and determination have earned you the right to face me in battle, mortals. I await your assault on my platform! Come!}} |
||
| + | |||
| + | ==Loot== |
||
| + | {{lootbox|Normal Mode |
||
| + | |Gale Rouser Belt |
||
| + | |Lightning Well Belt |
||
| + | |Mistral Circle |
||
| + | |Permafrost Signet |
||
| + | |Planetary Band |
||
| + | |Sky Strider Belt |
||
| + | |Soul Breath Belt |
||
| + | |Star Chaser Belt |
||
| + | |Tempest Keeper Belt |
||
| + | |Thunder Wall Belt |
||
| + | |Wind Stalker Belt |
||
| + | }} |
||
| + | |||
| + | {{lootbox|Heroic Mode |
||
| + | |Gale Rouser Belt (heroic) |
||
| + | |Lightning Well Belt (heroic) |
||
| + | |Mistral Circle (heroic) |
||
| + | |Permafrost Signet (heroic) |
||
| + | |Planetary Band (heroic) |
||
| + | |Sky Strider Belt (heroic) |
||
| + | |Soul Breath Belt (heroic) |
||
| + | |Star Chaser Belt (heroic) |
||
| + | |Tempest Keeper Belt (heroic) |
||
| + | |Thunder Wall Belt (heroic) |
||
| + | |Wind Stalker Belt (heroic) |
||
| + | }} |
||
| + | |||
| + | ==Related achievements== |
||
| + | *{{achievement|Heroic: Conclave of Wind}} |
||
| + | *{{achievement|Stay Chill}} |
||
| + | |||
| + | ==Videos== |
||
| + | {| class="darktable" |
||
| + | |- valign=top |
||
| + | ! Conclave of Wind (all three bosses) Guide by [http://www.youtube.com/user/omfgcata OMFGCATA on YouTube] |
||
| + | |- |
||
| + | ! <youtube>jOUulX8cgSI</youtube> |
||
| + | |} |
||
| + | |||
| + | {| class="darktable" |
||
| + | |- valign=top |
||
| + | ! A Comprehensive Guide by [http://www.youtube.com/BlueXephos The Yogscast on YouTube] |
||
| + | |- |
||
| + | ! <youtube>zqxVQKIdLuQ</youtube> |
||
| + | |} |
||
| + | |||
| + | {| class="darktable" |
||
| + | |- valign=top |
||
| + | ! [GUIDE] Conclave of Wind (25N) by [http://www.youtube.com/user/alpha1337 Sleepless Knights on YouTube] |
||
| + | |- |
||
| + | ! <youtube>lP8ApDQWRyc</youtube> |
||
| + | |} |
||
| + | |||
| + | {| class="darktable" |
||
| + | |- valign=top |
||
| + | ! colspan=2 | Conclave of Wind by [http://www.youtube.com/LoDtvz LoD on YouTube] |
||
| + | |- |
||
| + | ! Complete Video Walkthrough, covering every detail |
||
| + | |- |
||
| + | ! <youtube>iBHZ3VfB2fw</youtube> |
||
| + | |} |
||
| + | |||
| + | {| class="darktable" |
||
| + | |- valign=top |
||
| + | ! colspan=2 | Conclave of Wind by [http://www.youtube.com/tgnWorldofWarcraft TGN on YouTube] |
||
| + | |- |
||
| + | ! 10 Normal strategy and kill || 10 Heroic first look |
||
| + | |- |
||
| + | ! <youtube>1Er473sRbRc</youtube> |
||
| + | ! <youtube>YBEtPSNn4D0</youtube> |
||
| + | |} |
||
| + | <br> |
||
| + | |||
| + | ==Patch changes== |
||
| + | ... |
||
| + | |||
| + | ==Trivia== |
||
| + | *[[Siamat]], Lord of the South Wind was most likely also a member of the Conclave, however due to his [[Neferset|other tasks]], lost tremendous amount of his own power, and therefore is temporarily not present. |
||
| + | |||
| + | == References == |
||
| + | {{reflist}} |
||
==External links== |
==External links== |
||
| − | <!-- Read http://www. |
+ | <!-- Read http://www.wowwiki.com/WoWWiki:External_links before posting your links here. |
Links that do not conform to the rules will be DELETED. |
Links that do not conform to the rules will be DELETED. |
||
Repeat violations may result in a BAN. |
Repeat violations may result in a BAN. |
||
Have a nice day. :) --> |
Have a nice day. :) --> |
||
| − | {{Elinks-item|40717}} |
||
Revision as of 21:01, 8 January 2011
Template:Stub/Cataclysm
 | |||||||
| Race(s) | Djinni (Elemental) | ||||||
| Level | ?? Boss | ||||||
| Location | Throne of the Four Winds | ||||||
| Status | Killable | ||||||
| |||||||
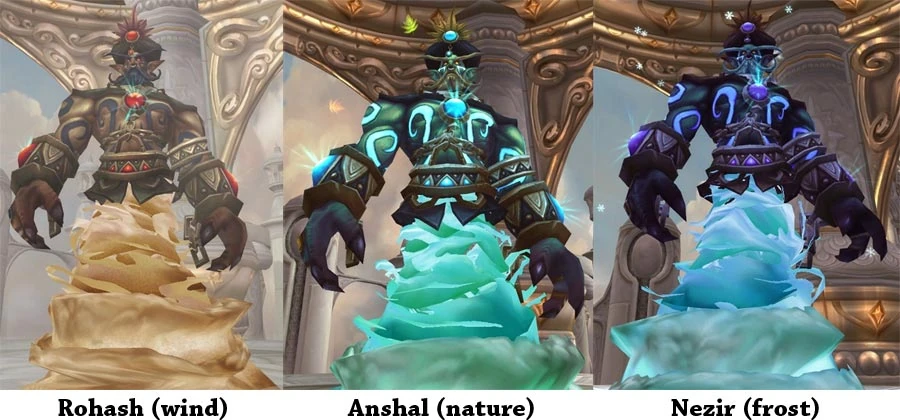
The Conclave of Wind is a boss encounter in Throne of the Four Winds. The encounter consists of Anshal, Rohash, and Nezir, the djinni lords of wind and must be eliminated in order to battle the elemental lord himself.
Although they are spread out, engaging one djinn in combat engages them all. While they will not leave their platforms, each of the individual lords will put a significant debuff (such as reducing Haste by 500% with increasing frost damage over time) on all players if at any point there is no attackable target on their platform.
The world first heroic kill was by Paragon (25 person) on 17 December 2010.
Abilities
Anshal
 Soothing Winds — Summons an area of calm winds (Green circle) on a random friendly target. This area heals all allies for 20000 per second. Any enemies within the area are silenced an pacified while they remain inside the area. This effect lasts for 30 sec.
- Nurture — Summons a Ravenous Creeper nearby every second for 5 sec. Ravenous Creepers have Toxic Spores.
- Toxic Spores — Spores errupt from the caster every second for 5 seconds, afflicting all enemies within 8 yards with a deadly toxin. This toxin deals 500 Nature damage per second for 5 sec and can stack up 25 times.
- Zephyr — (Full energy) Heals all allies within 100 yards for 25000 health per second. In addition, these targets will also gain 15% increased damage for 15 sec. This effect stacks.
Nezir
- Wind Chill — Deals 4750 to 5250 Frost damage to all enemies within 100 yards and increases all Frost damage taken by 10% for 35 sec. Stacks.
- Permafrost — Channels a blast of Frost at Nezir's current target, dealing 9500 to 10500 Frost damage per second in a cone towards that target for 3 sec. (14250 to 15750 Frost damage on Heroic difficulty)
- Ice Patch — Deals 7125 to 7875 Frost damage per second to all enemies within 20 yards, slowing their movement speed by 10% . This effect stacks. Lasts 3 sec. (19000 to 21000 Frost damage per second on Heroic difficulty.)
- Sleet Storm — (Full energy) Deals 28500 to 31500 Frost damage per second to all targets within 100 yards. This damage is divided among all targets. Lasts 15 sec.
Rohash
- Slicing Gale — Cast instead of melee-ing. Fierce winds slice through a random enemy target, dealing 11875 to 13125 Nature damage (10-man difficulty), increasing Nature damage they receive by 5% for 30 sec. This effect stacks. (23750 to 26250 Nature damage on Normal 25-man difficulty, 28500 to 31500 Nature damage on Heroic 25-man difficulty)
- Wind Blast — Spins slowly around the platform, blasting the area in front of the caster every second. Any enemies caught within this area are dealt 9500 to 10500 Nature damage and knocked back 200 yards. Lasts 10 sec.
- Tornado — Summons 3 tornados nearby. These tornados move around the area randomly, dealing 38000 to 42000 Nature damage to any enemies that get within 10 yards of them, knocking them back.
- Hurricane — (Full energy) Creates a huge vortex of wind, catching all nearby enemies and launching them into the air. Anyone caught by the vortex will take 2500 Nature damage per second for 15 sec. At the end of this effect, affected targets will be dropped out of the air, resulting in additional falling damage.
Enrage
Bosses enrage after 8 minutes in 25-man normal mode.
Overview
Each of the Djinn has an energy bar that slowly approaches 90. When it reaches 90 they will cast their most powerful abilities. All three gain energy at the same rate, and all three will reach 90 at the same time. Players cannot jump between platforms while they are at full strength.
If any Djinn is left alone on his platform, with no player in range, it will cast a raid-wiping ability. Anshal will cast Withering Winds, which reduces all healing by 100%. Nezir will cast Chilling Winds, which will reduce haste by 500%. Rohash will cast Deafening Winds, which will silence everyone in the zone. All three of these abilities include a zone-wide AoE damage tick that increases over time.
You can move between their platforms by jumping into a wind bridge that connects the platforms. However, the bridges disappear when the Djinn are at 90 energy and using their special abilities.
Both Anshal and Nezir do normal melee damage, while Rohash does not require a tank.
When one Djinn dies, it begins to cast Gather Strength, which will resurrect it to full health after one minute. Thus, all three Djinn need to be killed within one minute of each other.
Strategy
There are two alternating phases - the recharge phase, when boss energy is below 90, and the full energy phase, when the bosses are using their ultimate abilities - Zephyr, Sleet Storm and Hurricane. During the recharge phase, the raid is divided between Rohash and Anshal, with DPS bringing them down evenly. During the full energy phase, most of the raid is on Nezir, with DPS bringing him down as much as possible. The general goal is to kill Rohash and Anshal at as close to the same time as possible, while having done enough damage to Nezir during full energy phases to burn him down within the one minute resurrection timer.
Recharge Phase
During the recharge phase, DPS is split between Rohash and Anshal, while Nezir is handled by just a tank and his healers.
The Rohash group requires fewer DPS and healers, and generally favors ranged DPS due to the Tornadoes that are summoned. No tank is needed since it has no hard-hitting melee attack. Instead, he casts randomly at anyone on the platform. This group needs to watch for Tornadoes and Wind Blast, which can knock you off the platform. The Wind Blast mechanic is similar to the Spout spell from The Lurker Below encounter in Serpentshrine Cavern. He will start at a random direction and move clockwise for 10 seconds, blasting anyone in his line of sight. Everyone on the platform needs to move clockwise to avoid the blast or be knocked off and most likely killed.
The Anshal group requires a tank and slightly more healing compared to the Rohash group. This group also needs extra DPS, due to adds and Anshal's healing ability. When Rohash summons Ravenous Creepers, the DPS need to split these up and burn them down quickly before the Toxic Spores stack too high on everyone. An extra tank or high armor DPS can help to separate them. Avoid the Soothing Winds healing circle on the ground, as it heals the boss and Creepers, and pacifies any player in it.
The Nezir group requires only a tank and healing. During the recharing phase, no DPS is with Nezir. The tank needs to face the boss away from anyone else to avoid excess damage from Permafrost. The healers will need to move out of any Ice Patches that appear, and take care not to stand on the pathways coming in to the platform. During the full energy phase, players from the other platforms will move to Nezir's platform, and they don't want to land in a patch of ice. Wind Chill will stack on the Nezir group and damage will increase throughout the phase.
The tank and tank healers for Anshal and Nezir will swap positions every other recharging phase to deal with the stacking Wind Chill debuff.
Full Energy Phase
At around 80 energy, most of the raid will swap to the Nezir platform to handle his Sleet Storm. The bridges to move between platforms disappear at 90 energy, so players should allow enough time to make it over to their new platforms.
The entire Rohash group, except for a single healer, will move to the Nezir platform. The single healer left behind at Anshal needs to handle the Hurricane, which works much like the Vortex ability in the Malygos encouter. This healer should be able to heal himself through the Hurricane with instant abilities, and survive the moderate fall damage at the end.
The entire Anshal group, including the tank and his healers, will move to the Nezir platform. The DPS should be sure they've finished off any remaining Creepers before transferring, or they will be healed during Zephyr.
The tank and tank healers at Nezir will move to Anshal's platform to tank him through Zephyr.
During the Sleet Storm, burn down Nezir as much as possible. The raid will be taking constant damage from Sleet Storm during this phase. As long as enough people are still alive and the damage is split sufficiently, the raid healing should be manageable.
Once Sleet Storm is finished channeling, DPS move back to their previous platforms, Anshal or Rohash, and continue to bring them down evenly. The tank and tank healers for Nezir and Anshal remain at their swapped positions. This is to allow enough time for the stacking Wind Chill debuff to fade from the tank group that just handled Nezir.
Nezir Burn Phase
Anshal and Rohash should die at as close to the same time as possible. Once one dies, the one minute resurrection timer begins, and you need to be able to finish off Nezir before they resurrect. If one is almost dead while the other is behind, call to stop DPS and let them catch up. If one is consistently far behind by the time they are almost dead, then re-balance your DPS groups for the next attempt. It's also possible to re-balance DPS mid-fight after full energy phases when everyone is at Nezir's platform.
Once Anshal and Rohash are dead, everyone moves to Nezir's platform to finish him off. By this time, he should be well below 50% health from previous Sleet Storm phases. Save Heroism/Bloodlust abilities and big DPS cooldowns for this final burn phase. You need to kill him before Anshal or Rohash resurrect, and also before the Wind Chill debuff sacks too high for your raid healers to manage.
If the burn phase is not working out, consider intentionally delaying the death of Anshal and Rohash to add an extra full energy phase to bring down Nezir a bit lower. Note that this approach will bump you closer to the enrage timer. Alternatively, consider staying on Nezir for a few more seconds after a Sleet Storm, before moving back to Anshal and Rohash, to bring him down a bit more. However, staying on Nezir means increased raid damage from Wind Chill, possibly falling behind on adds summoned by Anshal, and increased damage to the lone healer still at Rohash.
The key to this fight will be finding the right balance of DPS for each group assignment, and making the final burn phase doable.
Quotes
Anshal
- Aggro
- It shall be I that earns the favor of our lord by casting out the intruders. My calmest wind shall prove too much for them!
- Killing a player
- Begone, outsiders!
- Your presence shall no longer defile our home!
- Full power reached
- The power of our winds, UNLEASHED!
- Low health
- My power grows feeble, brothers. I shamefully must rely on you for a time.
Rohash
- Aggro
- As I am the strongest wind, it shall be I that tears the invaders apart!
- Full power reached
- The power of our winds, UNLEASHED!
- Low health
- The intruders stand fast, brothers. I cannot break them. Allow me a brief respite to strengthen my winds.
Nezir
- Aggro
- The honor of slaying the interlopers shall be mine, brothers! Their feeble bodies will freeze solid from my wind's icy chill!
- Full power reached
- The power of our winds, UNLEASHED!
- Low health
- The intruders stand fast, brothers. I cannot break them. Allow me a brief respite to strengthen my winds.
Defeat
- Al'Akir yells: The Conclave of Wind has dissipated. Your honorable conduct and determination have earned you the right to face me in battle, mortals. I await your assault on my platform! Come!
Loot
|
Related achievements
Videos
| Conclave of Wind (all three bosses) Guide by OMFGCATA on YouTube |
|---|
| A Comprehensive Guide by The Yogscast on YouTube |
|---|
| [GUIDE] Conclave of Wind (25N) by Sleepless Knights on YouTube |
|---|
| Conclave of Wind by LoD on YouTube | |
|---|---|
| Complete Video Walkthrough, covering every detail | |
| Conclave of Wind by TGN on YouTube | |
|---|---|
| 10 Normal strategy and kill | 10 Heroic first look |
Patch changes
...
Trivia
- Siamat, Lord of the South Wind was most likely also a member of the Conclave, however due to his other tasks, lost tremendous amount of his own power, and therefore is temporarily not present.