mNo edit summary |
KirkBot@legacy41551589 (talk | contribs) (Typo fixing, typos fixed: unresistable → unresistible using AWB) |
||
| Line 15: | Line 15: | ||
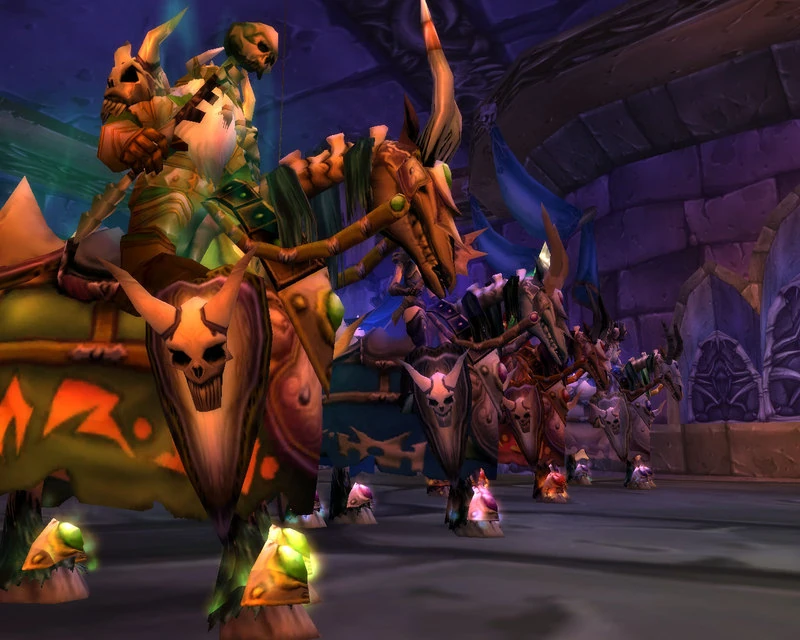
The '''Four Horsemen''' are four powerful death knights in the service of {{NPC||Kel'Thuzad}} in his dread citadel of [[Naxxramas]]. They originally were {{NPC||Highlord Alexandros Mograine}} <The [[Ashbringer]]>, {{NPC||Thane Korth'azz}}, {{NPC||Lady Blaumeux}}, and {{NPC||Sir Zeliek}}. |
The '''Four Horsemen''' are four powerful death knights in the service of {{NPC||Kel'Thuzad}} in his dread citadel of [[Naxxramas]]. They originally were {{NPC||Highlord Alexandros Mograine}} <The [[Ashbringer]]>, {{NPC||Thane Korth'azz}}, {{NPC||Lady Blaumeux}}, and {{NPC||Sir Zeliek}}. |
||
| − | Generally regarded as one of the most difficult encounters of Pre-Burning Crusade World of Warcraft, the coordination, timing, and relatively unforgiving nature made them one of the hardest bosses in the instance, along with Gothik the Harvester and Kel'Thuzad. Contrary to the other encounters in Naxxramas where more DPS and brute force would certainly help the raid, this encounter focused on taking your time to defeat, moving orderly. It stands to this day as the most amount of time a single encounter laid undefeated while also not requiring any retuning or bug fixing, at approximately 7 weeks, compared to |
+ | Generally regarded as one of the most difficult encounters of Pre-Burning Crusade World of Warcraft, the coordination, timing, and relatively unforgiving nature made them one of the hardest bosses in the instance, along with Gothik the Harvester and Kel'Thuzad. Contrary to the other encounters in Naxxramas where more DPS and brute force would certainly help the raid, this encounter focused on taking your time to defeat, moving orderly. It stands to this day as the most amount of time a single encounter laid undefeated while also not requiring any retuning or bug fixing, at approximately 7 weeks, compared to 3–5 days for Sunwell Plateau bosses (time determined from Death and Taxes, who achieved the first world kill of the Horsemen seven weeks after encountering them). The raid setup of the encounter required an excessive number of tanks, meaning that even once guilds had figured out what to do it took a lot of time to prepare the requisite number of tanks for the encounter. |
{{clrl}} |
{{clrl}} |
||
| Line 40: | Line 40: | ||
*# Does not persist after death. |
*# Does not persist after death. |
||
*# Applies regardless of LoS. |
*# Applies regardless of LoS. |
||
| − | *# Classified as physical school (meaning it is |
+ | *# Classified as physical school (meaning it is unresistible) but deals shadow damage (SR does not mitigate it, shadow protection potion can absorb it though). |
*# Nothing can remove the marks, including Ice Block, Divine Shield, Divine Intervention, or Flask of Petrification. |
*# Nothing can remove the marks, including Ice Block, Divine Shield, Divine Intervention, or Flask of Petrification. |
||
Revision as of 18:50, 10 April 2009
- This article concerns the original Four Horsemen encounter when Naxxramas was over the Eastern Plaguelands, introduced in Patch 1.11. For the 10 and 25-man versions introduced with Wrath of the Lich King, see Four Horsemen.
| The Four Horsemen | |
|---|---|
 | |
| Race | Varies (Undead) |
| Level | ?? Boss |
| Location | Deathknight Wing, Naxxramas |
The Four Horsemen are four powerful death knights in the service of Kel'Thuzad in his dread citadel of Naxxramas. They originally were Highlord Alexandros Mograine <The Ashbringer>, Thane Korth'azz, Lady Blaumeux, and Sir Zeliek.
Generally regarded as one of the most difficult encounters of Pre-Burning Crusade World of Warcraft, the coordination, timing, and relatively unforgiving nature made them one of the hardest bosses in the instance, along with Gothik the Harvester and Kel'Thuzad. Contrary to the other encounters in Naxxramas where more DPS and brute force would certainly help the raid, this encounter focused on taking your time to defeat, moving orderly. It stands to this day as the most amount of time a single encounter laid undefeated while also not requiring any retuning or bug fixing, at approximately 7 weeks, compared to 3–5 days for Sunwell Plateau bosses (time determined from Death and Taxes, who achieved the first world kill of the Horsemen seven weeks after encountering them). The raid setup of the encounter required an excessive number of tanks, meaning that even once guilds had figured out what to do it took a lot of time to prepare the requisite number of tanks for the encounter.
In World of Warcraft: Wrath of the Lich King, with the moving of Naxxramas from the Eastern Plaguelands to Northrend, this original version of the encounter will be removed from the game and will no longer be accessible. Additionally, in the current version of the encounter, Highlord Mograine, whereabouts unknown, is replaced by Baron Rivendare.
Attacks and abilities
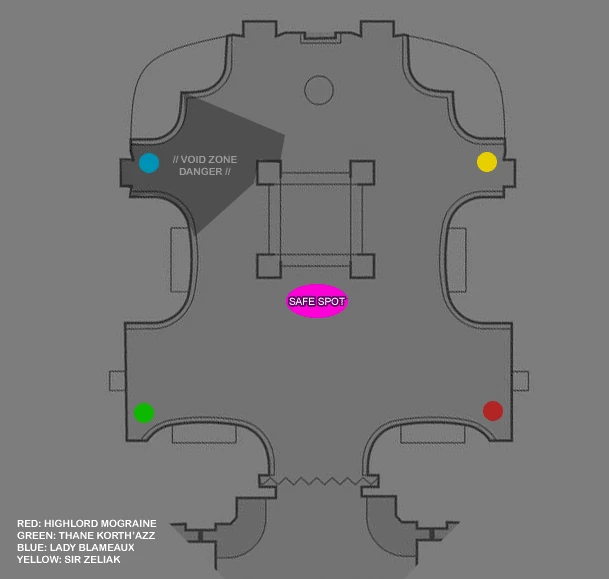
The room shape is strange, as shown on the right side.
The four horsemen have several common features:
- Each horseman has about 800k health.
- All 4 horsemen can be disarmed.
- Enrage: At 100 marks cast, horsemen will enrage and use their abilities with no cooldown. This will take just over 20 minutes.
- Summon Spirit: When each horseman dies, his/her spirit is summoned out, stay at the place and keep giving out marks. DO NOT go near them, they can 1 shot melee range target. This means the safe zone will remain the same even after you killed some of the four horsemen. They are not targetable in this state.
 [Shield Wall]
- All 4 horsemen will shield wall at 50% hp and 20% hp for 20 seconds.
- Horsemen Mark:
- Unique to each boss and acts just like Firemaw debuff.
- First Horsemen Mark is applied at 20 sec.
- Horsemen Mark reapply every 12 seconds.
- It is possible that every 12 sec when Marks hit, all players' aggros on horsemen are reduced by 50%, which means you need to stay easy on DPS when tank transition. If such a check wasn't in place, by the end of the fight, the tanks would have such a huge amount of aggro it would be impossible to lose aggro.
- Mark does damage as 0, 250, 1000, 3000, 5000, 6000, 7000...., which means that you can only stay in for 7 marks maximum. Any more is almost certain death.
- Lasts for 75 seconds since last time reapplied, then its timer resets.
- Has a range of 65-70 yards (can be outdistanced to drop the debuff)
- Does not persist after death.
- Applies regardless of LoS.
- Classified as physical school (meaning it is unresistible) but deals shadow damage (SR does not mitigate it, shadow protection potion can absorb it though).
- Nothing can remove the marks, including Ice Block, Divine Shield, Divine Intervention, or Flask of Petrification.
As well as a single unique ability:
- Highlord Mograine — Righteous Fire
- 2160-2640 frontload damage + 4800 DoT in 8 secs. Identical to Ragnaros' Elemental Fire, mitigated by fire resistance. Applied as a 25% chance on melee hit to proc.
- Thane Korth'azz — Meteor
- 14250-15750 fire damage, share between all people within 8 yards from the center the meteor drops. Cooldown is 12 secs. Random target in ~ 20 yards. Players will have to stack up when fighting Thane Korth'azz to avoid having the full damage piled upon one person.
- Sir Zeliek — Holy Wrath
- Holy damage 495-605, hits aggro target and continues to chain until no one is within the 5 yards distance of the last target (no loop). Every chaining will double the damage. Cooldown is 12 secs.
- Lady Blaumeux — Void Zone
- Summon a Void Zone that deals shadow damage to enemies that stand within it (approx 3500-4500 damage per tick). Small radius, approximatley 5 yards. Persists for 90 seconds when dropped. Range: 45 yards. Cooldown is 12 seconds. Persist after she is killed.
Strategies
The Four Horsemen Positioning
From the mechanics of the Horsemen marks, each Horseman must be taken to a separate corner, and tanked there. Whilst having one Mark stack up will do too much damage and kill you, it is possible to have all 4 marks stack to a lesser extent and survive. 4 Marks of Mograine (3000 damage per tick) hurt a lot more than one Mark from each (no damage at all).
This means tanks must be rotated in and out, otherwise they will die from the Mark stacking too much. A second tank must then be ready to taunt the enemy off the original tank as soon as the debuff becomes fatal. The range of these debuffs is ~50 yards, making rotation timing key.
At level 70
- You may have to rotate the tanks and healers like at lvl 60 (depending on the tanks gear)
- This was done with 5 tanks (4 warriors, 1 feral druid) by burning the first one as fast as possible, and then rotating after about 6 marks.
- This was done with 4 tanks (2 prot warriors, 1 dps warrior, 1 prot paladin) by burning the first two very fast, then rotating on the other two.
- This was done with 4 tanks (3 prot warriors, 1 feral druid) by burning the first two fast, and then taking the last two down one by one, Zeliek being last. Having 12 marks on the feral druid didn't cause any hassle.
Loot table
While some had speculated that the Four Horsemen's loot tables were generated in similar fashion to the Three Bugs of the Temple of Ahn'Qiraj, with the kill order determining the loot awarded, repeated kills have now indicated that the kill order does not affect the loot. In addition to their non-set drops, the Four Horsemen also drop two Tier 3 chest tokens.
|
|
Discussion
When players pass beyond Gothik the Harvester, the Four Horsemen have a sort of conversation during which they are all introduced.
- Sir Zeliek yells: Invaders! Cease this foolish venture at once! Turn away while you still can!
- Lady Blaumeux yells: Come, Zeliek, do not drive them out. Not until we've had our fun!
- Highlord Mograine yells: Enough prattling. Let them come. We shall grind their bones to dust.
- Lady Blaumeux yells: I do hope they stay long enough for me to... introduce myself.
- Sir Zeliek yells: Perhaps they will come to their senses... and run away as fast as they can.
- Thane Korth'azz yells: I've heard enough a' yer snivelin'! Shut your flytrap before I shut it for ye'!
- Highlord Mograine yells: Conserve your anger. Harness your rage. You will all have outlets for your frustrations soon enough.
Inspiration
They appear to be based on the Four Horsemen of the Apocalypse from the Book of Revelation, said to bring the end of the world — Zeliek as the White Rider of Conquest [1], Mograine as the Red Rider of War, Blaumeux as the Black Rider of Famine, and Korth'azz as the Pale Rider of Death.