Darksora110 (talk | contribs) (→Quotes) |
No edit summary |
||
| Line 1: | Line 1: | ||
| + | {{Infobox zone |
||
| − | {{for|character biography|Lady Naz'jar}} |
||
| ⚫ | |||
| − | {{npcbox |
||
| − | |name |
+ | |name=Eye of the Storm |
| + | |ss=Eye of the Storm loading screen.jpg |
||
| − | |image= Lady Naz'jar tactics.jpg |
||
| + | |capital= |
||
| − | |race = Naga sea witch |
||
| + | |race={{Race|Draenei}}<br />{{Race|BloodElf}} |
||
| − | |creature = Humanoid |
||
| − | |level |
+ | |level=35-85 |
| + | |loc=[[Netherstorm]] |
||
| − | |type= Elite |
||
| − | |location = [[Throne of Neptulon]], [[Throne of the Tides]] |
||
| ⚫ | |||
| − | |health = 1547k |
||
| − | |status= Killable |
||
| − | |instance=Throne of the Tides |
||
}} |
}} |
||
| + | [[Image:WorldMap-NetherstormArena.jpg|thumb|The Eye of the Storm in-game map.]] |
||
| − | '''Lady Naz'jar''' is the first boss of the [[Throne of the Tides]]. She can be found in the depths of [[Throne of the Tides]], and needs to be killed to unlock other bosses. |
||
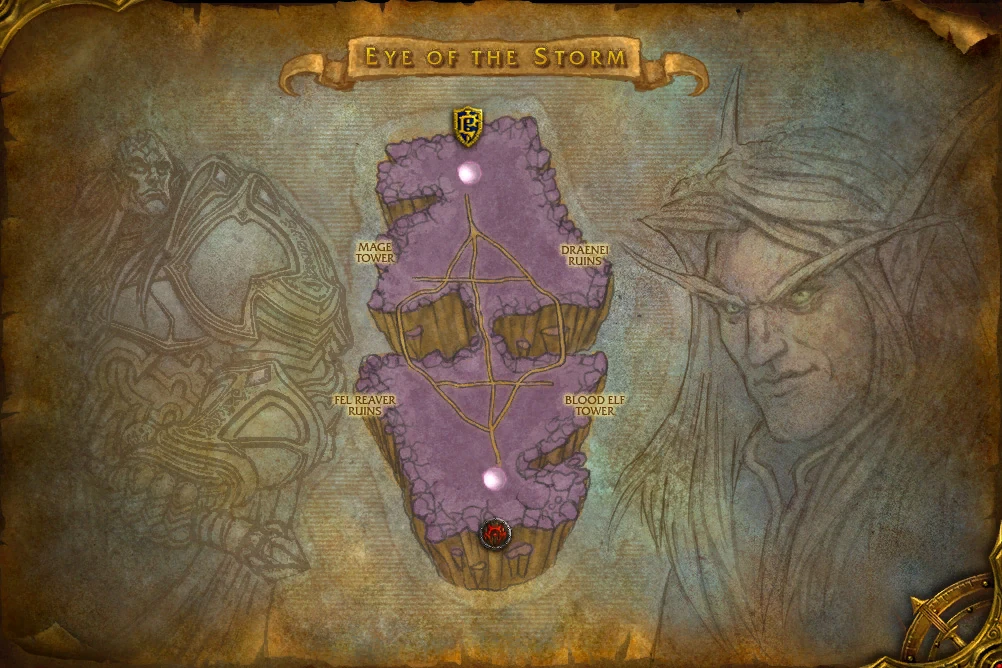
| + | [[Image:EotSbig.jpg|thumb|Map plus tactical objectives.]] |
||
| + | The '''Eye of the Storm''' is a [[battleground]] located within the [[Netherstorm]]. This battleground consists of 4 capture points and a flag in the center. The overall goal is to be the first team to score 1600 points (similar to [[Arathi Basin]]). The player maximum is 15 players for each faction. |
||
| − | Lady Naz'jar played a pivotal role in the retaking of [[Vashj'ir]] from the brutal [[Kvaldir]], earning her Queen [[Azshara]]'s favor. Recently Naz'jar spearheaded an assault against [[Neptulon]] and succeeded in cornering the powerful elemental lord within his throne room.<ref>[[Encounter Journal]]</ref> |
||
| + | == Overview == |
||
| − | Before fighting the mistress herself, the group must overcome several of her naga servants and murlocs. |
||
| + | Eye of the Storm is a battleground which combines World PVP like that in the [[Eastern Plaguelands]] and traditional battlegrounds PVP as in [[Warsong Gulch]] ([[Capture the Flag]]), with the "resource" requirements (points) of [[Arathi Basin]]. |
||
| + | The main objective for each team is to hold as many towers as possible, much like in Arathi Basin, and then to score points by bringing the flag from the center of the map to one of the those towers. The towers work much like those in the Eastern Plaguelands or [[Hellfire Peninsula]]: players stand in them to capture them and the more people standing in them the faster the capture goes. More towers held increases the potential to score points. Each flag return to a friendly tower rewards points depending on the number of towers controlled by the team. The game ends when one side reaches 1600 points. If the flag carrier dies (similar to Warsong Gulch) then the flag is dropped and can be picked up by any player. Thus it is possible, and sometimes tactically advantageous, for one team to allow the opposing team to pick up the flag initially, then kill the flag carrier and seize the flag, returning it to one of its towers and scoring a flag capture. If the flag is not promptly picked up after being dropped, it will return to its spawn point (much like Warsong Gulch). Again, a player may return the flag to any tower owned by their team, so holding many towers is helpful not only in scoring points, but also in creating more options in retrieving the flag. |
||
| − | ==Abilities== |
||
| − | *[[Image:spell_nature_lightning.png|32px| Blasts the target with lightning, dealing 141375 to 158625 Nature damage.]] Shock Blast - An interruptable spell which takes 3 seconds to cast. The spell deals 33,250 to 36,750 damage to the target, which is about half of the hit points to the tank at early levels, a tank can therefor survive without the spell being interrupted, but it is adviseable to do so. |
||
| − | *[[Image:spell_nature_lightning.png|32px| Blasts the target with lightning, dealing 141375 to 158625 Nature damage.]] Shock Blast (Heroic) - An interruptable spell which takes 2 seconds to cast. The spell deals 141,375 to 158,625 damage to the target, which is devastating against the tank, which is why it is vital that the group are able to interrupt each cast. |
||
| − | *[[Image:Spell frost chillingblast.png|32px| Summons a Geyser at a random player's location. After 5 seconds, this Geyser errupts, dealing 23750 to 26250 Frost damage and knocking back all enemies within 0 yards of the target area.]] Geyser - Summons a geyser on the ground under a random player that erupts after 2 seconds, launching the target into the air. The spell deals 23,750 to 26,250 damage to any characters standing over it when it erupts. |
||
| − | *[[Image:Ability_creature_disease 03.png|32px| Hurls deadly fungal spores at a random target, exploding on impact in a 0 yard radius. Any targets caught within this radius take 10000 Nature damage every 3 sec for 15 sec.]] Fungal Spores - Fungal Spores will be thrown at a random players feet, which deals 10,000 every 3 seconds for 15 seconds, the debuff is removable, but is not prioritized, moving away from the Fungal Spores is a better way of avoiding it. |
||
| − | *[[Image:inv_elemental_primal_water.png|32px| Creates a whirling vortex of water, periodically knocking back enemies within 0 yards. In addition, the whirling water will deflect any spells cast at the caster and cause all ranged attacks to miss. Lasts 1 min.]] Waterspout - A 1.5 second cast that buffs Lady Naz´jar, which causes all spells cast on her reflect, and all ranged attacks on her miss. |
||
| − | ** Nearby enemies will also be knocked back, making her immune for 1 minute. During this minute, 3 adds will spawn: 2 Naz'jar Tempest Witch (spell casters) and a Naz'jar Honor Guard (melee dps). |
||
| − | ** Lady Naz´jar will engage in the battle again after one minute, whether these adds are killed or not. |
||
| − | ** Lady Naz´jar casts this spell twice during the encounter, at 66% hp and at 33% hp. |
||
| − | ** The Tempest Witch casts two different spells, a 2 second cast Chain Lightning and a 1 second cast Lightning Surge. The Lightning Surge deals 14138 to 15862 Nature damage, while the chain lightning deals 9,250 to 10,750 Nature damage in normal mode and 37000 to 43000 Nature damage in Heroic mode. He does not cast any noticeable spell, but has a nasty enrage ability. |
||
| − | ** When all of the adds are killed, you can proceed to kill Lady Naz'jar. |
||
| − | ** During this phase in Heroic mode, mini water tornados will spawn on the boss, about 5 at a time, and then proceed to move outwards towards the edge of the room. These must be avoided, as if they contact a player, that player becomes ‘stunned’ and is carried to the edge of the room while taking a steady stream of damage. |
||
| + | Flying mounts are not allowed in the battleground. This prevents people from using certain floating areas to their advantage. |
||
| − | ==Strategy== |
||
| − | *When you start the encounter, the gates you enter from will lock. Periodically she will open a Geyser. Players have to dodge these or it'll deal about 25k damage to all players standing on it, as well as lunging them into the air. |
||
| − | *When she casts Waterspout at 66% and 33%, you'll be met with two Naz'jar Tempest Witches and one Naz'jar Honor Guard. The damage the Naz'jar Tempest Witches do is moderate but can prove to be a problem when dealing damage to multiple enemies, which is why one of these Tempest Witches should be [[crowd control]]led, and the other interrupted and nuked down fast. The Naz'jar Honor Guard is definitely prioritized last of the three mobs, but in Heroic mode, The Honor Guard can be particularly bothersome, and do a lot of damage. If the group does not feel prepared to deal with the damage, consider crowd controlling the Honor Guard instead. |
||
| − | *Ideally, a group will have 2 or more crowd controllers. [[Polymorph]] (mage), [[Hex]] (shaman), and [[Repentance]] (retribution paladin) are all capable of repeatable long-term crowd control on humanoids. Also, in an emergency, a rogue can use [[Vanish]] and [[Sap]] for a one-time CC. If a group has two crowd controllers, they should coordinate to stop the casters and then focus down the honor guard. Establishing before the fight which side each crowd controller will be on helps greatly (the casters spawn to the left and right sides of the room, at the edge of the center ring). Overall, communication is key. |
||
| + | Falling (or jumping) in the void between the land masses kills any player, after a short fall. This doesn't cause any durability penality. |
||
| − | ==Quotes== |
||
| + | [[File:Eye of the Storm TCG.jpg|thumb|In the [[WoW TCG]].]] |
||
| − | ;Gauntlet Start |
||
| − | *{{Text|Yell|Armies of the depths, wash over our enemies as a tide of death!}} |
||
| + | == Entrance == |
||
| − | Gauntlet Ends |
||
| + | Players must be at least level 35 to be eligible to join the Eye of the Storm Battleground. The brackets are 35-39, 40-44, 45-49, etc. up to 80-84 and 85. Unlike the other Battlegrounds there is no physical entrance to Eye of the Storm in Outland. Players must interact with a [[battlemaster]] or use the PvP interface (default 'H' key) to join Eye of the Storm. [[Battlemaster]]s are located in all capitals back in Azeroth and [[Shattrath City]] in Outland's [[Terokkar Forest]]. [[Dalaran]] provides a portal to the Battleground in each faction's area of the city, on the mezzanine above the portals to cities. |
||
| − | *{{Text|Yell|Meddlesome gnats, you've thought us defeated so easily.}} |
||
| + | As of [[patch 3.1.0]], a player may queue up for the Eye of the Storm anywhere in the world by going to the battlegrounds tab of the Player vs. Player window. They will return to the location they chose to enter the battleground, not the queue, when the game ends. |
||
| − | ;Aggro |
||
| − | *{{Text|Yell|You have interfered with our plans for the last time, mortals!}} |
||
| + | == Basic rules == |
||
| − | ;66% |
||
| + | * Players start in a bubble for the first minute, isolated from the rest of the battleground (similar to other battlegrounds). |
||
| − | *{{Text|Yell|Take arms, minions! Rise from the icy depths!}} |
||
| + | * Horde and Alliance teams of up to 15 players compete to control the four towers spread throughout Eye of the Storm and capture flags. |
||
| + | * First faction to collect 1600 points wins. |
||
| + | * Unlike [[Arathi Basin]], points are always generated every second, no matter how many towers are controlled by both teams. |
||
| + | * Each claimed tower generates victory points for the controlling team. The more towers your team owns, the faster your team gains points |
||
| + | ** 1 tower controlled = 1 point/second |
||
| + | ** 2 towers controlled = 2 points/second |
||
| + | ** 3 towers controlled = 5 points/second |
||
| + | ** 4 towers controlled = 10 points/second |
||
| + | NB: Based on the opposing faction controlling whichever towers you do not, neutral towers are not included in the calculation for either side |
||
| + | * Grab flag in center and run it to one of the towers owned by your faction. |
||
| + | * Points are earned per flag capture when flag is brought to a tower controlled by the player's faction. |
||
| + | * Points from flag captures |
||
| − | ;33% |
||
| + | ** 1 towers controlled = 75 points |
||
| − | *{{Text|Yell|Destroy these intruders! Leave them for the great dark beyond!}} |
||
| + | ** 2 towers controlled = 85 points |
||
| + | ** 3 towers controlled = 100 points |
||
| + | ** 4 towers controlled = 500 points |
||
| + | * Outside of [[holiday weekend]], 1600 points earns 167 bonus honor |
||
| − | ;Killing a player |
||
| + | * Outside of holiday weekend, capping the flag with 4 nodes held while at 1810 points or more earns 188 bonus honor. |
||
| − | *{{Text|Yell|The abyss awaits!}} |
||
| − | *{{Text|Yell|Depths take you!}} |
||
| + | ==Strategies and opinions== |
||
| − | ;Death |
||
| − | *{{Text|Yell|Ulthok... stop them...}} |
||
| + | ===Flag fighting strategy=== |
||
| − | ==Loot== |
||
| + | One often used strategy is to have one or two people capture each tower on the starting side of the battleground at the beginning of the match, with the rest of the team quickly pushing to the flag and gaining control of the middle. However, this strategy only works when the other team uses the same strategy. If the other team goes for towers while your forces are in the middle, you will lose the game in mere minutes as the other team racks up 10 points per second and your team is standing there with a useless flag. |
||
| − | {{lootbox|Normal |
||
| − | |Aurelian Mitre |
||
| − | |Entwined Nereis |
||
| − | |Lightning Whelk Axe |
||
| − | |Periwinkle Cloak |
||
| − | |Wrasse Handwraps |
||
| − | }} |
||
| + | Fights should take place near a tower, on the hill. Fighting outside the cap radius of a tower does not advance the control meter and does not stop the graveyard from spawning enemies. |
||
| − | {{lootbox|Heroic |
||
| − | |Aurelian Mitre (heroic) |
||
| − | |Entwined Nereis (heroic) |
||
| − | |Lightning Whelk Axe (heroic) |
||
| − | |Periwinkle Cloak (heroic) |
||
| − | |Wrasse Handwraps (heroic) |
||
| − | }} |
||
| + | ===Three tower strategy=== |
||
| ⚫ | |||
| + | If one side has three towers, and the other side only has one tower, it is most likely that the side with three towers will win, even if the other side captures all the flags from start to finish. The reason for this style of play is that flag capping gives points depending on the number of towers the same side controls. If you have more towers, flag caps are worth more. If you have fewer they give fewer points. At the current mechanics, no number of flag runs can win the game for the side which only controls one tower from start to finish. |
||
| − | *{{Achievementlong|Old Faithful}} |
||
| + | The best strategy is to capture three towers right at the start. Groups 1 and 2 will head to one of the opponent's towers while one person from Group 1 or 2 will cap the same tower on their side. Group 3 will head to the other tower on your side and cap it, staying there to defend. The flag is left alone. No-one should go for the flag, although there is an option to get a druid to head for the flag, in case the opponent is following the same course of action. |
||
| − | ==Videos== |
||
| − | <youtube>ijVpr-9Yjr0</youtube> |
||
| + | If you are Alliance, the forces will look something like this |
||
| − | ===Heroic=== |
||
| + | * 9 to DR |
||
| − | <youtube>AMIV_4f4IpA</youtube> |
||
| + | * 1 to BE |
||
| − | <youtube>ckUbhA_4luY</youtube> |
||
| + | * 5(4) to FR\ |
||
| + | * 1 druid to flag (Optional) |
||
| + | |||
| + | If you are Horde, it will look something like this |
||
| + | * 9 to FR |
||
| + | * 1 to MT |
||
| + | * 5(4) to DR |
||
| + | * 1 druid to flag (Optional) |
||
| + | |||
| + | ===Opinions on flag fighting strategy=== |
||
| + | Some do not agree with the Flag-Fighting Strategy. Assuming 100% flawless execution of the strategy, all these have to occur. |
||
| + | * Your side managed to capture both your towers with minimal force |
||
| + | * You managed to get the other 13 members to the midfield |
||
| + | * No one attacks your towers |
||
| + | * And you win the fight mid field to run the flag |
||
| + | |||
| + | This strategy requires you to maintain control of the midfield while ensuring a proper tower defense, as well as flag-running consistently. While this strategy is quite common in PUGs, it is very difficult to utilize properly, as it requires a large amount of teamwork, and there are many counter-strategies an organized team can use. Speculation for the use of this strategy is an attempt to accrue honor via [[Honorable Kill]]s. |
||
| + | |||
| + | ===Opinions on tower control=== |
||
| + | '''Opinion 1''' |
||
| + | |||
| + | If your side controls only one tower, regaining control of a second tower should be the highest priority. If the other side controls three towers it is virtually impossible to win no matter how many times you capture the flag. To see this, consider the case where your faction controls one tower and the other faction controls three. The other faction is gaining four points more per second than your faction (5 vs 1). Each flag capture for your faction is worth 75 points (in this scenario). You would have to capture the flag every 18.75 seconds to negate the 4 point per second difference. Even if you manage to cap every 18.75 secs you are only keeping pace with the opposing faction. A faction which controls only one tower for most of the battle cannot win. |
||
| + | |||
| + | Capturing the flag in a 1 versus 3 situation still gives you points. However, holding the flag will prevent the opposing faction from earning an even greater point advantage. So it is reasonable to have a few people trying to capture flags—after all, if you have the flag then they can't get 100 points for it. |
||
| + | |||
| + | While a team holding three towers is in a better position to four-cap (take control of all the bases), they may find trouble with the opposing faction pushing in force on their third tower with only one or two people from that faction running the flag. This can ultimately make or break the game depending on how strong the defense of that tower is. |
||
| + | |||
| + | '''Opinion 2''' |
||
| + | |||
| + | Any strategy involving the capture of three towers is extremely risky due to defenses being spread too thin. The only time it should ever be attempted is when you significantly outnumber your opponents, or you're running a premade with flawless coordination. |
||
| + | |||
| + | Capturing two towers, playing defense, and above all, '''controlling the flag spawn''' leads to a virtually guaranteed victory as long as everyone is on board. |
||
| + | |||
| ⚫ | |||
| + | {{:Player vs. Player achievements/Eye_of_the_Storm}} |
||
| + | |||
| + | == Notes == |
||
| + | There is a glitch with the starting bubble you can some times leave the bubble before it has loaded |
||
== Patch changes == |
== Patch changes == |
||
| − | *{{Patch 4. |
+ | * {{Patch 4.2.0|note=Eye of the Storm has been added into the rotation as a 10-man Rated Battleground.}} |
| − | *{{Patch 4.0.3a|note= |
+ | * {{Patch 4.0.3a|note=Minimum required level reduced to 35, brackets split into a 5-level range instead of 10.}} |
| + | * {{Patch 3.3.3|note=Battlegrounds will no longer award Marks of Honor. |
||
| + | :* Players with existing Marks of Honor can still turn them in to their respective faction's quest givers, including individual marks for those who may have more marks for one Battleground than another. |
||
| + | :* Items which previously required Marks of Honor will have their costs adjusted to remove these requirements.}} |
||
| + | *{{Patch 3.2.0|note= |
||
| + | :* When standing at a capture point that you control, you will gain a buff called Honorable Defender. This buff grants +50% honor gained from kills. |
||
| + | :* The time it requires to capture the center flag has been reduced to 8 seconds, down from 10 seconds |
||
| + | :* The game now ends when one team reaches 1600 victory points, down from 2000.}} |
||
| + | * {{Patch 2.2.0|note=The points received for capturing the flag depends on the number of towers controlled by your faction.|comment=Previously, each flag capture awarded 75 points regardless.}} |
||
| − | == |
+ | == See also == |
| + | * [[Alliance battleground strategies]] |
||
| + | |||
| + | == External links == |
||
<!-- Read http://www.wowpedia.org/Wowpedia:External_links before posting your links here. |
<!-- Read http://www.wowpedia.org/Wowpedia:External_links before posting your links here. |
||
Links that do not conform to the rules will be DELETED. |
Links that do not conform to the rules will be DELETED. |
||
Repeat violations may result in a BAN. |
Repeat violations may result in a BAN. |
||
Have a nice day. :) --> |
Have a nice day. :) --> |
||
| + | {{Elinks-zone|3820}} |
||
| − | {{elinks-NPC|40586|armory=1}} |
||
| + | {{Elink|type=wowus|link=http://www.worldofwarcraft.com/pvp/battlegrounds/eyeofthestorm/index.xml|desc=Eye of the Storm Battleground Preview}} |
||
| + | |||
| + | {{Netherstorm}} |
||
| + | {{battlegrounds}} |
||
| + | [[Category:Battlegrounds]] |
||
| − | {{DEFAULTSORT:Naz'jar, Lady}} |
||
| − | [[Category: |
+ | [[Category:Burning Crusade]] |
| − | [[Category: |
+ | [[Category:Eye of the Storm| ]] |
| − | [[Category:Throne of the Tides mobs]] |
||
Revision as of 01:24, 25 July 2011
| Level: 35-85 | |
|---|---|
 | |
| Location | Netherstorm |

The Eye of the Storm in-game map.

Map plus tactical objectives.
The Eye of the Storm is a battleground located within the Netherstorm. This battleground consists of 4 capture points and a flag in the center. The overall goal is to be the first team to score 1600 points (similar to Arathi Basin). The player maximum is 15 players for each faction.
Overview
Eye of the Storm is a battleground which combines World PVP like that in the Eastern Plaguelands and traditional battlegrounds PVP as in Warsong Gulch (Capture the Flag), with the "resource" requirements (points) of Arathi Basin.
The main objective for each team is to hold as many towers as possible, much like in Arathi Basin, and then to score points by bringing the flag from the center of the map to one of the those towers. The towers work much like those in the Eastern Plaguelands or Hellfire Peninsula: players stand in them to capture them and the more people standing in them the faster the capture goes. More towers held increases the potential to score points. Each flag return to a friendly tower rewards points depending on the number of towers controlled by the team. The game ends when one side reaches 1600 points. If the flag carrier dies (similar to Warsong Gulch) then the flag is dropped and can be picked up by any player. Thus it is possible, and sometimes tactically advantageous, for one team to allow the opposing team to pick up the flag initially, then kill the flag carrier and seize the flag, returning it to one of its towers and scoring a flag capture. If the flag is not promptly picked up after being dropped, it will return to its spawn point (much like Warsong Gulch). Again, a player may return the flag to any tower owned by their team, so holding many towers is helpful not only in scoring points, but also in creating more options in retrieving the flag.
Flying mounts are not allowed in the battleground. This prevents people from using certain floating areas to their advantage.
Falling (or jumping) in the void between the land masses kills any player, after a short fall. This doesn't cause any durability penality.


In the WoW TCG.
Entrance
Players must be at least level 35 to be eligible to join the Eye of the Storm Battleground. The brackets are 35-39, 40-44, 45-49, etc. up to 80-84 and 85. Unlike the other Battlegrounds there is no physical entrance to Eye of the Storm in Outland. Players must interact with a battlemaster or use the PvP interface (default 'H' key) to join Eye of the Storm. Battlemasters are located in all capitals back in Azeroth and Shattrath City in Outland's Terokkar Forest. Dalaran provides a portal to the Battleground in each faction's area of the city, on the mezzanine above the portals to cities.
As of patch 3.1.0, a player may queue up for the Eye of the Storm anywhere in the world by going to the battlegrounds tab of the Player vs. Player window. They will return to the location they chose to enter the battleground, not the queue, when the game ends.
Basic rules
- Players start in a bubble for the first minute, isolated from the rest of the battleground (similar to other battlegrounds).
- Horde and Alliance teams of up to 15 players compete to control the four towers spread throughout Eye of the Storm and capture flags.
- First faction to collect 1600 points wins.
- Unlike Arathi Basin, points are always generated every second, no matter how many towers are controlled by both teams.
- Each claimed tower generates victory points for the controlling team. The more towers your team owns, the faster your team gains points
- 1 tower controlled = 1 point/second
- 2 towers controlled = 2 points/second
- 3 towers controlled = 5 points/second
- 4 towers controlled = 10 points/second
NB: Based on the opposing faction controlling whichever towers you do not, neutral towers are not included in the calculation for either side
- Grab flag in center and run it to one of the towers owned by your faction.
- Points are earned per flag capture when flag is brought to a tower controlled by the player's faction.
- Points from flag captures
- 1 towers controlled = 75 points
- 2 towers controlled = 85 points
- 3 towers controlled = 100 points
- 4 towers controlled = 500 points
- Outside of holiday weekend, 1600 points earns 167 bonus honor
- Outside of holiday weekend, capping the flag with 4 nodes held while at 1810 points or more earns 188 bonus honor.
Strategies and opinions
Flag fighting strategy
One often used strategy is to have one or two people capture each tower on the starting side of the battleground at the beginning of the match, with the rest of the team quickly pushing to the flag and gaining control of the middle. However, this strategy only works when the other team uses the same strategy. If the other team goes for towers while your forces are in the middle, you will lose the game in mere minutes as the other team racks up 10 points per second and your team is standing there with a useless flag.
Fights should take place near a tower, on the hill. Fighting outside the cap radius of a tower does not advance the control meter and does not stop the graveyard from spawning enemies.
Three tower strategy
If one side has three towers, and the other side only has one tower, it is most likely that the side with three towers will win, even if the other side captures all the flags from start to finish. The reason for this style of play is that flag capping gives points depending on the number of towers the same side controls. If you have more towers, flag caps are worth more. If you have fewer they give fewer points. At the current mechanics, no number of flag runs can win the game for the side which only controls one tower from start to finish.
The best strategy is to capture three towers right at the start. Groups 1 and 2 will head to one of the opponent's towers while one person from Group 1 or 2 will cap the same tower on their side. Group 3 will head to the other tower on your side and cap it, staying there to defend. The flag is left alone. No-one should go for the flag, although there is an option to get a druid to head for the flag, in case the opponent is following the same course of action.
If you are Alliance, the forces will look something like this
- 9 to DR
- 1 to BE
- 5(4) to FR\
- 1 druid to flag (Optional)
If you are Horde, it will look something like this
- 9 to FR
- 1 to MT
- 5(4) to DR
- 1 druid to flag (Optional)
Opinions on flag fighting strategy
Some do not agree with the Flag-Fighting Strategy. Assuming 100% flawless execution of the strategy, all these have to occur.
- Your side managed to capture both your towers with minimal force
- You managed to get the other 13 members to the midfield
- No one attacks your towers
- And you win the fight mid field to run the flag
This strategy requires you to maintain control of the midfield while ensuring a proper tower defense, as well as flag-running consistently. While this strategy is quite common in PUGs, it is very difficult to utilize properly, as it requires a large amount of teamwork, and there are many counter-strategies an organized team can use. Speculation for the use of this strategy is an attempt to accrue honor via Honorable Kills.
Opinions on tower control
Opinion 1
If your side controls only one tower, regaining control of a second tower should be the highest priority. If the other side controls three towers it is virtually impossible to win no matter how many times you capture the flag. To see this, consider the case where your faction controls one tower and the other faction controls three. The other faction is gaining four points more per second than your faction (5 vs 1). Each flag capture for your faction is worth 75 points (in this scenario). You would have to capture the flag every 18.75 seconds to negate the 4 point per second difference. Even if you manage to cap every 18.75 secs you are only keeping pace with the opposing faction. A faction which controls only one tower for most of the battle cannot win.
Capturing the flag in a 1 versus 3 situation still gives you points. However, holding the flag will prevent the opposing faction from earning an even greater point advantage. So it is reasonable to have a few people trying to capture flags—after all, if you have the flag then they can't get 100 points for it.
While a team holding three towers is in a better position to four-cap (take control of all the bases), they may find trouble with the opposing faction pushing in force on their third tower with only one or two people from that faction running the flag. This can ultimately make or break the game depending on how strong the defense of that tower is.
Opinion 2
Any strategy involving the capture of three towers is extremely risky due to defenses being spread too thin. The only time it should ever be attempted is when you significantly outnumber your opponents, or you're running a premade with flawless coordination.
Capturing two towers, playing defense, and above all, controlling the flag spawn leads to a virtually guaranteed victory as long as everyone is on board.
Achievements
| Title | Description | Rewards |
|---|---|---|
Win Eye of the Storm.
|
10 | |
Complete 100 victories in Eye of the Storm.
|
10 | |
Win Eye of the Storm with a score of 1500 to 0.
|
10 | |
Win Eye of the Storm 10 times while holding 4 bases.
|
10 | |
Win Eye of the Storm in under 6 minutes.
|
10 | |
Kill 5 flag carriers in a single Eye of the Storm battle.
|
10 | |
Personally carry and capture the flag in Eye of the Storm.
|
10 | |
In a single Eye of the Storm match, capture the flag 3 times without dying.
|
10 | |
In a single Eye of the Storm battle, get 5 honorable kills at each of the bases.
|
10 | |
In Eye of the Storm, kill a player who is under the effects of the Berserker power-up.
|
10 | |
Get a killing blow while under the effects of the berserker buff in Eye of the Storm.
|
10 | |
While your team holds 4 of the bases in Eye of the Storm, personally grab the flag and capture it.
|
10 | |
| Complete the Eye of the Storm achievements listed below. | 25 |
Notes
There is a glitch with the starting bubble you can some times leave the bubble before it has loaded
Patch changes
 Patch 4.2.0 (2011-06-28): Eye of the Storm has been added into the rotation as a 10-man Rated Battleground.
 - Patch 4.0.3a (2010-11-23): Minimum required level reduced to 35, brackets split into a 5-level range instead of 10.
- Patch 3.3.3 (2010-03-23): Battlegrounds will no longer award Marks of Honor.
- Players with existing Marks of Honor can still turn them in to their respective faction's quest givers, including individual marks for those who may have more marks for one Battleground than another.
- Items which previously required Marks of Honor will have their costs adjusted to remove these requirements.
- Patch 3.2.0 (2009-08-04):
- When standing at a capture point that you control, you will gain a buff called Honorable Defender. This buff grants +50% honor gained from kills.
- The time it requires to capture the center flag has been reduced to 8 seconds, down from 10 seconds
- The game now ends when one team reaches 1600 victory points, down from 2000.
- Patch 2.2.0 (2007-09-25): The points received for capturing the flag depends on the number of towers controlled by your faction.
- Previously, each flag capture awarded 75 points regardless.
- Previously, each flag capture awarded 75 points regardless.
See also
- Alliance battleground strategies
External links

| ||||||||||||||||||||||||||||||||