| Blackfathom Deeps | ||||||||||
|---|---|---|---|---|---|---|---|---|---|---|
| BFD | ||||||||||
 Blackfathom Deeps loading graphic | ||||||||||
| Location | The Zoram Strand, Ashenvale | |||||||||
| Race(s) |
Template:Dwarf Race Template:Gnome Race Template:Human Race Template:Makrura Race Template:Murloc Race Template:Naga Race Template:Orc Race Template:Satyr Race | |||||||||
| End boss | Aku'mai | |||||||||
| Advised level | 20-27 | |||||||||
| Minimum level | 10 | |||||||||
| Player limit | 5 (10) | |||||||||
| ||||||||||

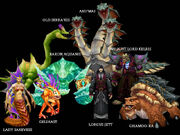
Blackfathom Deeps bosses
Blackfathom Deeps is a partially underwater dungeon in northwestern Ashenvale. It is accessed by a stair-lined shaft that requires one to swim through an underwater entrance. The deeps are comprised of a series of watery caverns leading deep to a temple devoted to the Old Gods. The Twilight's Hammer cult runs this shrine, and it has joined forces with local naga and satyrs to defend the unholy creature, Aku'mai. It seems an Old God may be underneath the land.[1]
History
This series of ruins and caverns was built into the side of a cliff directly south of Black Fathom Bay. Many dangerous creatures lurk within - including, if tales at the Fish Eye Tavern are to believed, ghosts of heroes that fell to some nastiness while within the Deeps. Others suggest that this place, once a night elf temple to Elune, is now the headquarters of the vile warlocks, known as the Shadow Council.[2] The naga here seem to be searching for something. The Twilight’s Hammer, a foul cult dedicated to the Old Gods, works with the naga in the underground ruins for an unknown purpose.[3]
From the World Dungeons page on the official World of Warcraft Community Site:
- Situated along the Zoram Strand of Ashenvale, Blackfathom Deeps was once a glorious temple dedicated to the night elves' moon-goddess, Elune. However, the great Sundering shattered the temple - sinking it beneath the waves of the Veiled Sea. There it remained untouched - until, drawn by its ancient power - the naga and satyr emerged to plumb its secrets. Legends hold that the ancient beast, Aku'mai, has taken up residence within the temple's ruins. Aku'mai, a favored pet of the primordial Old Gods, has preyed upon the area ever since. Drawn to Aku'mai's presence, the cult known as the Twilight's Hammer has also come to bask in the Old Gods' evil presence.
Geography
Maps
- WorldMap-BlackFathomDeeps3.jpg
Sub-regions
| Aku'mai's Lair | • | The Drowned Sacellum | • | The Forgotten Pool | • | Moonshrine Ruins | • | Moonshrine Sanctum | • | The Pool of Ask'ar |
Quest guide
Walkthrough
This underwater cove can be tricky to navigate for the first time, but it's a great place to hone your skills and find your role when in a group.
Level appropriate groups should watch out for two things. The first is that there are many magic casting Naga which, when amassed in numbers, can do a good deal of damage. Always keep a warrior with shield bash on any casting mobs, or any other class that can stun/interrupt like Shamans and Paladins. Also, this is a great dungeon to try out crowd control. Many of the enemies pulled to you will come with friends. In addition, there are invisible Satyr that you cannot see until they have come close enough to aggro you.
Caution should be used when combating the murlocs. Once at low health, they run quite fast, often running back towards the other murlocs and the murloc boss Gelihast. Keep a form of snare on these guys. The latter part of the instance includes the Twilight Cultists. These foes come in groups of two or three, but often can include more if you aren't aware of wanderers. The ideal way to avoid an unwanted add is to pull with range, targeting the casters first (which you can get to follow you by cutting the Line of Sight, i.e. turning around a corner), and sheeping, sapping, or off tanking the adds. Also, having the highest level person in your group do the pulling helps, due to their smaller aggro radius.
The 'summoning chamber' with Twilight Lord Kelris includes many other cultists in the room. It is recommended to use the walled off entrance to your advantage, pulling the mobs one by one from the large room until Kelris is alone. After the room is cleared, he is ready to be engaged safely. Once he is defeated, all four candles pieces on the middle altar will need to be lit in order to advance past the large door to the final boss. Right-click these one at a time because a small group of mobs is summoned from the adjacent doors every time you do. Defeat these one at a time to avoid death.
The final boss is relatively easy if you have a dedicated tank and healer. See walk-through for Aku'mai. A stylishly hatted dwarf will await you at the end, giving Alliance players an option to port to Darnassus.
Resources
Dungeon denizens
- File:IconSmall Crab Small.gif Crabs
 Dark Iron dwarves (one, Morridune)
 Dwarves
 Forsaken
 Gnomes
 Humans
- File:IconSmall Hydra Small.gif Hydras (one, Aku'mai)
- File:IconSmall Makrura Small.gif Makrura
- File:IconSmall Murloc Small.gif Murlocs

 Naga
Naga Night elves (one, Argent Guard Thaelrid)
 Orcs
Orcs- File:IconSmall Satyr Small.gif Satyr

 Tauren
- File:IconSmall Threshadon Small.gif Threshadons
- File:IconSmall Turtle Small.gif Turtles

 Trolls
- File:IconSmall Water Small.gif Water Elementals
Encounters
| Bosses | Monsters |
|---|---|
|
|
|
|
|
|
|
|
|
|
|
|
|
|
|
Loot
Notes
- Also known as: BFD (not to be confused with BRD, which is Blackrock Depths.)
- Sometimes misidentified as Blackfathom Depths.
- Found in: Ashenvale Forest, Northwest corner (The Zoram Strand)
- Enemy Level Range:
- Outside Instance: 20-21
- Inside Instance: 22-24 (Elite)
- Gain entrance at level: 10
- 10 Player Limit (However quests can only be completed with 5 - which is how it is most often tackled)
Patches and hotfixes
 Patch 1.3.0 (2005-03-07):
- Capped at ten players.
- Characters dying in the instanced portions of Blackfathom Deeps will now correctly receive a corpse marker in the minimap and see the message letting them know that they need to enter the instance before they will be able to resurrect.
References
External links
| ||||||||


